Construction of a rabbitry is a serious undertaking.
The rate of weight gain and fur density are also affected by the illumination of the rabbitry and the length of daylight hours. Rabbits are most active at dusk and at night. Bright lighting is undesirable for them. A sufficient level of illumination is 50-70 lux for adults, 25-30 lux for fattening young animals. At the same time, the duration of daylight hours is 16-18 hours, so in winter lighting is required, but dim. To make the lighting more comfortable when servicing the rabbitry, install several additional light bulbs above the cages, but connect them to the second switch (or to the second key). Another option is to install a brightness control (dimmer). It is installed instead of a regular switch and allows you to change the illumination by turning the control knob.
How to make a galvanized pallet with your own hands
What are the most suitable cages for poultry?
Your heart is torn between common sense and the desire to decorate the interior... Know that the choice of cage is as important as its location. So, after you have brought the bird home, place the box or cage where it was riding at the door of its new cage: this will be an opportunity for the birds to familiarize themselves with the new area on their own. Also, this is not the time to vacuum or play the trumpet!
Poultry cages are usually rectangular in shape. Your feathered pet's home should also be wide enough for the bird to spread its wings. Take a larger cage right away if you plan to add neighbors to your pet over time. Make sure that the distance between the bars does not allow the bird to slip out.
Another important point to consider is the comfort of the cage. So, a double bottom will be a real find, since it will allow the bird not to walk on its own droppings. The doors should also be wide enough for you to be able to fit your hand through.
Installing a cage in the kitchen or bathroom is not a good idea because... Birds are fragile animals. The optimal temperature for them is from 17 to 22 ° C, with the humidity as stable as possible. Cigarette smoke is harmful to birds #40; and who is it not harmful to? #41; and fumes coming from cooking.
If you place the cage in the bedroom, be careful as many birds wake up at sunrise and start the day by singing. Thus, the most suitable option for placing the cage is the living room. However, proximity to heating devices, fans or air conditioning should be avoided.
Place the cage about 1.5 meters above the ground, or if you have a cat, hang it from the ceiling, well away from any shelf. In fact, who can be sure that the instincts of a predator will not awaken in the mustachioed-striped one at the sight of a new feathered pet?
thank you... for some reason I thought that they could chew on this enamel
_____________________________________
I didn’t manage to do much today, but the main thing
and next weekend I’ll do the sheathing and adjust the little things, I found good material, it won’t get caught and it’s washable, I think it’ll do
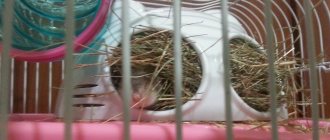
I finished the hole, took it with a grinder, but even though I came across a hard press, I almost ruined it on it, so I checked it with a drill, steamed for half an hour and knocked it out, sanded it, and of course I trimmed it for softness, so that the belly would not be scratched.
distant view access to the hole
view and burrows
then I started attaching the walls
Well, of course, I won’t describe this process in detail,
True, he attached it in such a way that it would be easier to sheathe it later, and the ferret wouldn’t pick it off or chew it off inside.
then I started making a roof, since the cage was closed with 3 stars. I thought there wouldn’t be enough light, so I made the roof out of plexiglass
I fastened it with boards on the sides, tightly, I didn’t fasten the glass itself, you can remove it, of course, if you strain and pull it =_ well, and put it in place in the same way
so far everything looks like this
___________________________
How to make a chicken cage with your own hands
Cage keeping of chickens has many advantages compared to conventional keeping. Firstly, the capacity of the birds becomes larger, since chicken cages can be placed in several tiers. Secondly, as chickens move less, weight gain becomes faster and feed consumption decreases. Finally, thirdly, it is easier to monitor and care for a bird in a cage.
It is worth noting that there are several types of cages, and the choice depends only on the purpose for which you keep chickens. For egg-laying hens, one cage is needed, for broilers - another, and for chickens, as a rule, brooders are used. Therefore, before you buy a cage for chickens. it is necessary to find out the features of the content of one or another type.
You can make a chicken cage yourself. For this you will need: nails, pieces of wood, a welding machine, a galvanized sheet, a metal corner, a mesh, a sheet bender and a drinker. First, make a drawing of the future chicken cage.
Please note that the cell for 1 chicken should be the following dimensions: 610mm wide, 525mm long and 520mm high. In addition, between the lower and upper rows of cells you need to leave space for a pallet.
Place several cells in a row, make 2 levels, do not forget to add a few centimeters to the legs at the bottom, because the cage should not be located directly on the floor.
Calculate the length and height of the cage. From a metal corner make 4 vertical posts, 6 long horizontal bars and the same number of short ones, and then weld the base for the cage from this. Check the reliability of the design.
Make the floor in the chicken cage from galvanized mesh. It is important to make the floor at a slope of 6⁰; such a slight slope will prevent the chickens from feeling discomfort, and the laid eggs will roll away from under the chickens. It is better to tilt it towards the front of the cage, and at the bottom make a shelf for eggs from the mesh; it will ensure safe and convenient storage of eggs.
It is better to make the feeder from galvanized sheet. Cut a strip 30cm wide and equal to the length of the cage.
Divide the cells with a horizontal mesh of rods, and place a galvanized iron tray on the mesh. Thanks to this, the chicken waste will directly fall onto the tray.
Finally, equip the cage with drinking bowls. Now you have an idea of how to build a chicken cage.
How to make a quail cage with your own hands
In this article, we will look in detail, with photographs, at several models of quail cages and cage batteries made by ourselves. We will also apply some methods that will allow you to avoid unpleasant odors and the formation of dust on furniture, if, of course, you decide to keep a bird in the house.
In order not to get carried away with a review of the many designs of cages for quails (of which there are really a lot), below I will give basic concepts, as well as dimensions, based on which, you can easily independently design a cage for a cottage or apartment of any size.
- The optimal option for planting quails is 1 head per 100 cm² of cage floor.
- The optimal number of quails per cage is 30 heads.
- Cage for quails (for 30 pcs.) dimensions: length 100cm. width 40 cm.
For keeping meat and meat-egg breeds, cage dimensions can vary by +- 5 cm.
- The height of the back wall is 20 cm.
- The height of the front wall is 25 cm.
- The cell size of the floor mesh is 12x12 mm, wire diameter is from 0.9 mm to 2 mm.
- The tilt angle for collecting eggs is 8-10°.
- The protrusion of the egg collector is 7-10 cm, with the obligatory presence of side sides (otherwise the egg will fall down).
- The front wall is also a door (the best option is to save space). Attached with wire or loops.
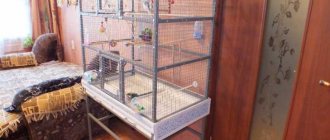
DIY bird cage
Each bird kept in captivity must have its own cage. The statement that a feathered friend would be much better off living in an apartment without her is completely wrong.
How to make a bird cage?
Let's get started
- Choice of material. Before you start making a bird cage with your own hands, decide on the material. The easiest way is to make a house for birds from metal at home. To do this you will need a metal mesh, corners and fasteners. MDF, chipboard, fiberboard or wooden boards are suitable for making a pallet.
Sources: www.8lap.ru, horek.net, sait-sovetov.net, greendacha.com, womanadvice.ru
We make cages for laying hens
Cage housing is one of the options for raising poultry, which has a lot of positive aspects. Firstly, you can have many times more chickens due to the fact that the cells can be placed in several tiers.
Secondly, due to the restriction of movements, laying hens gain weight more actively, while reducing the amount of feed consumed.
Thirdly, cages for laying hens are much easier to keep clean, as required by poultry farming standards.
I recommend that you decide on what type of cage to build based on the purpose for which you plan to keep birds on your farm. For example, cages for laying hens are radically different from cages for broilers, and chickens are kept in special brooders. Simply put, the type is determined by the characteristics of the content of a particular species.
If we talk about cages for laying hens, their design is quite simple, since it is a regular parallelepiped made of mesh, where only the material with which the floor is covered can change. You can make cages for laying hens with your own hands without much difficulty.
To do this, you will need a standard set consisting of wooden blocks, nails, a sheet of galvanized metal, metal corners, a drinking bowl, a feeder, a sheet bender and a welding machine.
All of the above is enough to create high-quality cage equipment for laying hens, guaranteeing them comfortable housing.
Dimensions
It is very important, before creating a drawing of the bird’s future habitat, to understand the dimensions. I propose to look at the basic numbers using the example of a cage for laying hens designed for one individual, they are often called cells.
Its length should be equal to sixty centimeters, its height should be only forty-five centimeters, and its depth should be half a meter.
Making a trough from galvanized steel with your own hands
Good day, dear guest!
The first sheet with galvanic coating came off the assembly line of one of the British factories back in 1867. True, at that time the metal was covered exclusively with gold and silver. But before the First World War, the production of parts with a protective layer of zinc began to be produced, and since then they have been incredibly popular.
This is not surprising - zinc extends the life of iron by 20-30 times. Products made of galvanized steel are durable, do not rust, and behave in everyday life no worse than stainless steel, although they are much cheaper.
In today’s article, I propose to pay more attention to this modest material and tell you how to make a galvanized pipe with your own hands.
Advantages and disadvantages of such a pipe
Galvanization is primarily steel, a material that has many undeniable advantages.
These include:
But without a protective coating, ferrous metal is susceptible to corrosion, quickly rusts and becomes unusable. Galvanizing successfully solved this problem. And, despite the fact that galvanized and steel pipes are the same in shape, the galvanized product has a number of advantages.
Additional advantages of galvanized products:
- Corrosion resistance, the ability to withstand negative environmental influences;
- Increased service life;
- Increased strength;
- Wide operating temperature range;
- High resistance to mechanical stress;
- Galvanized pipe can withstand high internal and external pressure;
- Simplicity and ease of installation;
- High resistance to fire;
- Zinc kills all pathogenic microorganisms;
- Galvanization is practically not inferior in quality to low-alloy stainless steel, but costs an order of magnitude less.
But, like any engineering solution, a galvanized iron pipeline is not ideal.
Disadvantages of the product:
- Not very attractive design;
- Expensive compared to conventional steel;
- Zinc complicates the welding process;
- Unlike plastic, if there are protrusions on the walls, it is almost impossible to ensure a smooth transition into structures made of galvanized pipes.
Make it yourself or order it
What is better, buy a galvanized sheet of the required thickness and bend the pipe yourself, or go to the store and buy a finished product?
Tips for choosing
As usual, let's start with the price. A finished pipe with a diameter of 100 mm and a length of 3 meters will cost you and me about 500 rubles. The cost of the material in this case is 150 rubles, the rest is labor costs and the seller’s markup.
What if you plan to organize an entire drainage system? You can see for yourself that you will have to overpay for finished products by 2.5-3 times. Making your own pipes will greatly ease the financial burden.
In addition, factory products have strictly defined dimensions, and sometimes it is difficult to choose the right one for your system. And the thickness of the finished pipe usually does not exceed 1 mm.
You should definitely remember that any factory-made product, unlike a home-made one, undergoes strict quality control control, has a perfectly round surface and a precision weld.
Whether a home master will be able to ensure compliance with all these conditions is far from certain.
Which material to choose
If you have decided to make the part yourself, you should start by choosing the material, in our case, a galvanized sheet of the required thickness.
Material characteristics
Thin sheet steel coated with zinc in the factory must comply with GOST 14918-80. Main characteristics that you should pay attention to when choosing:
The most common galvanizing thicknesses are from 0.35 to 3mm. The thinner the sheet, the easier it is to process, which is important for making products at home. But don’t forget – less thickness means less strength.
- Zinc coating thickness
There are 3 classes of material, in accordance with the thickness of the zinc coating layer. Let's summarize the data in a table for convenience.
| Steel class based on zinc layer thickness | Weight of protective layer on both sides (g) | Coating thickness (µm) |
| P (Increased) | 570 — 855 | 40-60 |
| I | 258-570 | 18-40 |
| II | 142.5-258 | 10-18 |
GOST allows some deviations in thickness and the presence of some defects
Marking:
- NR – normal thickness variation;
- UR – reduced thickness variation.
Sheet appearance options:
- KR – With crystallization patterns (some cracks and darkening);
- MT - without patterns.
An important characteristic for the manufacture of pipes is the ability of the metal sheet to be drawn:
- N – normal hood;
- G – deep drawing;
- VG – very deep drawing.
Steels marked VG have the highest ductility, N - correspondingly the lowest.
What you need for work
After purchasing a sheet with the necessary characteristics, you should stock up on the necessary equipment.
Required tools:
- Metal scissors. Choose a convenient tool for cutting a wide sheet of metal;
- A hand jackhammer (also known as a mallet) with a rubber or wooden tip. The mallet should be hard, heavy, but without sharp edges;
- Steel pipe blank for molding the pipe body (“gun”). Its length is at least 1 meter, its diameter depends on the required diameter of the finished product;
- Ruler;
- Tool for marking galvanized steel (sharp metal rod);
- Crafting table. At the corner of the workbench there should be a metal corner, at least 1 m long. It will be used to bend the edges of the pipe, so it must be fastened very securely;
- Pliers.
Size calculation
A standard galvanized sheet sheet has dimensions of 1000x2000mm, or 1250x2500mm, although other cuts can be found.
The width of the workpiece is calculated using the formula:
L (circumference, also known as the width of the workpiece) = 2*3.14*R (R is the required pipe radius, mm).
Thus, to make a pipe with a diameter of 100 mm, you will need a blank with a width
2x3.14x50mm = 314mm.
To the resulting finishing length we add a bend of 15mm and get the required value for cutting -300mm.
An important point is that the width of the workpiece is not a constant value. On one side it is 330mm, on the other 340 (for a pipe with a diameter of 100mm). This is done for the convenience of subsequent installation of pipes with each other or with other elements of the system.
Drawing and diagram
Rice. 1. Pattern of a sheet for a pipe with a diameter of 100 mm.
The fold formation pattern is as follows:
Rice. 2
Cutting out the workpiece
After calculating the required dimensions, a blank for the future product is cut out. For this:
- A sheet of tin is laid out on a horizontal surface, markings are applied in straight lines, strictly according to the dimensions of the semi-finished product.
For a pipe with a diameter of 100 mm, along one edge of the sheet, sections of 340 and 330 mm are measured one after another (see Fig. 1). The same segments, but in the opposite sequence, are marked on the opposite side. All perpendicular lines should be drawn using a square.
Don't forget to add 15-20mm to the width of the product on the bend!
- The tin is cut into rectangles according to the drawing.
Formation of a profile
The resulting rectangular blanks must be “transformed” into a pipe. To do this, we will create her profile.
Stages of profile formation:
- Along the entire length of the workpiece, with an indent of 5 mm on one edge and 10 mm on the other, two lines are drawn. These lines are the boundaries of the folds.
In our case, a seam or a seam lock means a type of connection between the edges of a pipe;
- We bend the edges along the marked line, strictly at an angle of 900. For this we use a metal corner, aligning the fold line with the edge of the corner. We start with pliers, continue with a mallet;
- We pass the hammer along the entire length, gradually forming the future seam;
- On a 10mm wide bend we make another bend in the shape of the letter G. The width of the top bar is 5mm, the location is strictly parallel to the workpiece;
- After forming the folds, we move on to the pipe body. We place the workpiece on the gun and use a hammer to give the sheet a round shape.
Processing the butt seam
The final stage is processing (crimping) the butt seam. To do this, bend the upper part of the L-shaped fold down, wrapping it around the opposite edge. The result is a fold of several layers of metal, which must be pressed against the pipe along its entire length.
In the factory, additional strength is added to the seam using special metal rivets.
For handmade products, no additional processing is required.
manufacturing
Check out useful videos on the topic.
Pipe making:
Inserting a pipe into a plane:
How to make a galvanized pallet with your own hands - Metalworker's Guide
Cage housing is one of the options for raising poultry, which has a lot of positive aspects. Firstly, you can have many times more chickens due to the fact that the cells can be placed in several tiers.
Secondly, due to the restriction of movements, laying hens gain weight more actively, while reducing the amount of feed consumed.
Thirdly, cages for laying hens are much easier to keep clean, as required by poultry farming standards.
I recommend that you decide on what type of cage to build based on the purpose for which you plan to keep birds on your farm.
For example, cages for laying hens are radically different from cages for broilers, and chickens are kept in special brooders.
Simply put, the type is determined by the characteristics of the content of a particular species.
If we talk about cages for laying hens, their design is quite simple, since it is a regular parallelepiped made of mesh, where only the material with which the floor is covered can change. You can make cages for laying hens with your own hands without much difficulty.
To do this, you will need a standard set consisting of wooden blocks, nails, a sheet of galvanized metal, metal corners, a drinking bowl, a feeder, a sheet bender and a welding machine.
All of the above is enough to create high-quality cage equipment for laying hens, guaranteeing them comfortable housing.
Manufacturing process
The process of creating cages for laying hens should begin by working with metal corners; from these eight vertical and twelve horizontal crossbars are created, from which the base is welded. I advise you to pay attention to the quality of welding, since how reliable the created structure will be largely depends on this process.
The floor in the cage for laying hens can be made of galvanized mesh. The most important thing is to ensure a tilt of six degrees.
Such a minor design change will greatly simplify the life of the hen, since all laid eggs will roll out from under her into a special chute.
It is best to make a slope in the front part, and at the bottom make a small trough from the mesh where you can safely store eggs.
It is best to move the chute out a little so that the chicken cannot get the egg back, and she, believe me, will try to do this. The chicken feeder should also be located in the front. It is made from galvanized sheet. It is enough to cut a strip of metal with a length equal to the length of the cage for laying hens and a width of thirty centimeters.
Drawing of a cage for chickens. 1 – drinking bowl; 2 – rods of the front wall; 3 – feeder; 4 – tray for collecting eggs; 5 – tray for collecting litter
Cages for laying hens must be separated using a horizontal mesh to which a galvanized iron tray is attached. This choice of materials makes it possible to provide comfortable living conditions for laying hens, whose waste will fall directly onto the pallet.
The back wall of the cage for laying hens should be made of a metal sheet or a sheet of plywood; for the front mesh, use a structure made of wide rods.
If you plan to make the floor in cages for laying hens not from mesh, but solid, then the birds will need to be kept on litter, and the total height of the cell will have to be increased by fifteen centimeters. It is best to use lumber in such a situation.
Firstly, they have a fairly attractive price, so you won’t have to spend too much. Secondly, a wooden floor will ensure comfortable living for the hen due to the fact that the bedding will not slide on it, which means that individual areas will not be exposed.
When developing a design drawing, many factors need to be taken into account, one of which is the price of materials. To minimize costs, frames for cages for laying hens can be made from wooden beams or ordinary drywall.
You just need to select a material that has the necessary strength qualities to ensure the reliability of the chicken’s house. Materials are selected for the floor to ensure that it does not sag over time.
That is why metal wire with a thickness of five millimeters is the optimal solution.
“DIY birdcage”
The video shows a design for laying hens and tells you how to make it yourself.
Making cages for laying hens with your own hands with assembly instructions and drawings
Not so long ago, chicken cages were considered a necessity only in poultry farms and large farms.
Today, many breeders who want to get more eggs from laying hens are thinking about such a purchase.
Why is this happening? What are the advantages of keeping poultry indoors? How to make a cage with your own hands? Let's look into these issues.
Requirements for cages for chickens
Chickens are unpretentious birds, but for maximum productivity you need to take care of a place that is comfortable for them. It is especially important to properly equip cages for laying hens. There are several important points to consider here:
- The size of the cage must correspond to the number of birds. One individual of an egg-bearing breed should have up to 600 cm2. If the breed is egg-meat, then the space can be increased to 800 cm2 per bird, since such varieties are usually large.
- Each cage should be equipped with a feeder and waterer for chickens.
- There should be no blank walls.
- The floor must be reliable, otherwise it will sag over time from the weight of the birds.
- The cage lattice should be strong, the cells should be small. This is an important requirement, since predators such as ferrets and weasels are able to fit into a fairly small hole. The largest cells are made in the front wall so that the chickens can stick their heads into them to eat; their approximate size is 5:10 cm.
- Special microclimate: the cage should always be warm and dry.
“Apartments” for raising chickens at home are installed indoors, for example, in a barn or chicken coop. In summer, it is possible to move the cells outside, but for this, the roofs of the structures should not allow moisture to pass through. To cover the cage with your own hands, in this case you can use slate or other inexpensive material.
Types of structures
Cages for chickens, depending on the capabilities of the breeder and the goals of breeding the birds, can be different. You can find the most incredible drawings of such structures, but all of them can be divided into the following types:
- With bedding. In this case, the floor is made blank and covered with straw or sawdust.
- With sloping floor and egg collector. This option involves a double floor, the upper part of which is made of lattice and has a slope. The lower part of the bottom is solid and is usually equipped with a sliding mechanism (tray). This design allows you to keep the cage clean and dry. The eggs roll down an inclined floor and fall into a special chute. This cage option for chickens is the best because it reduces the time the laying hen has in contact with the egg.
Any type can be assembled with your own hands. Even novice farmers can cope with this task at home.
Typically, cages for laying hens are made into group cages. The cage is designed for 7 – 10 individuals; in large farms this figure can be much higher. A cage battery for laying hens is suitable for a very large flock. It consists of cells in several rows and floors; it can also be assembled at home.
Pros and cons of cage keeping
For many, keeping chickens indoors in private farms remains a matter of dubious benefit. Opponents of this breeding method give the following arguments:
- Restricted movement. Chickens are active birds; they feel oppressed in a confined space, so the period of egg production may decrease.
- Lack of sun. Natural ultraviolet irradiation allows vitamin D to be synthesized; when kept indoors, it must be given in the form of food supplements.
- Dietary restrictions. Cages limit the birds' consumption of natural feed such as grass and insects, so all missing substances will have to be added to the feed in the form of mineral supplements.
- Rapid development of infection. Viral diseases spread quickly among birds in a confined space, since infected chickens are in close contact with the rest of the flock.
Selection of materials
Chicken cages can be made from the following materials:
- Wooden beam . The simplest structure that can be assembled at home is considered to be wooden. You need to cut a frame from a timber of a suitable size, and then fix a metal mesh on its front wall with large cells. You can cover the cage with a sheet of plywood or sheet metal. It is better to make the back wall from plywood, but it is desirable that it be mesh for good air exchange. It is better to make such structures small, otherwise they will not be strong enough. In this regard, this option is not suitable when installing cages in tiers.
- Metal profile . Structures made from such material are considered more reliable. Their frame needs to be welded and then the mesh attached to it. Galvanized iron should be used as a mesh. The finished cage will be durable and hygienic, since the metal does not rot and is not susceptible to mold. It must be borne in mind that such structures are non-demountable, so the frame must be immediately made to accommodate the construction of several sections.
To make the cage, meshes with a metal or wooden frame are used, since these materials are more practical in terms of hygiene and service life.
DIY galvanized pallet
I usually take the meter one.
If it is the right size, you can put a sheet from the oven of a gas stove or a plastic tray from catering times. This video will help you figure it out. Or just a basin or a baby bath?
Using the sketch, immediately estimate where and what size shape your shelves will be; also take their size into account when purchasing the mesh. Plus, I usually take 0.5 m more than calculated - in case of unforeseen mistakes.
When you have decided on the dimensions, you need to go either to the construction market or to any construction store to buy materials and tools:.
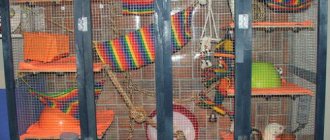
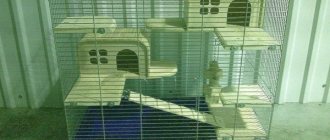
DIY rat cage
So, the materials have been purchased, you can proceed directly to constructing the cell. When unfolding the mesh, it is advisable to press the edges with something heavy.
When this is done and you have all the frame parts - walls, ceiling, shelves, etc.
Now you need to run your finger along the edges of all parts of the cage, and if you have parts that are not smooth, sharp or protruding above the edge, sand them with a file so that your animal does not get hurt, and carefully straighten all the parts.
If you are the lucky one who bought a painted mesh, then these procedures are of no use to you.
Usually I paint the cage when it is completely assembled, h. But this is not important, you can paint all the finished parts separately - this is much more convenient, and then additionally go through the joints.
Be sure to wash the mesh with white spirit before painting to degrease!!! Now I have a cage xx. It consists of 2 floors of 50 cm each.
How to make a galvanized pallet with your own hands?
Disassembles into 2 parts. If you decide to make the cage entirely with your own hands, first make the frame and only then the pallet! I will give an example of making a pallet for a cage with a base of 50x70 cm. The PVC consumption for such a pallet is a sheet of 1x1 m. PVC thickness - 4mm. Lay out the markings tightly on the PVC sheet. Measure the outside of the cage around the perimeter of the base.
Add 1 cm to the sides. For example, if the base of the cage is 50x70cm, then the internal dimensions of the pallet will be 51x71cm, and taking into account the thickness of the PVC, let's say 4 mm, the plate for the base of the pallet will be 51.8x71.8 cm, which can be rounded up to 52x72cm.
To strengthen the sides at the corners, I glue linings 10 cm wide and equal to the height of the side. They are glued together with an overlap. If you want to put your cage on wheels, then see the cage legs.
There are many different wheels, you need to choose based on expediency and finances - there is no point in taking large ones, small ones will perfectly withstand the weight of the cage.
There are rubber, silicone and plastic wheels. I prefer silicone ones, and they also have brakes. In my large cage there are large silicone wheels with a diameter of 5 cm, and there are brakes on the front wheels - it is very convenient to fix the cage during cleaning, when the rats are walking and trying to play with the soapy mistress from under the cage.
How to make a rabbitry
With brakes, you don't have to worry about accidentally running your wheel into someone's tail. The wheels need to be purchased with fastenings for screws, and then immediately the screws for them - the length of the screw should not exceed the thickness of the pallet legs.
After you have glued the pallet, do not rush to immediately put it in a cage with rats - the glue is toxic, let the pallet dry and weather for at least a week. This applies to all glued PVC products.
Mandatory for all PVC products! After cutting, the edges of PVC parts are very sharp.
I always chamfer the finished product, that is, cut it, glue it and let it dry, so as not to cut myself. Sharp edges and chamfering smoothing edges in other words:. This site uses Akismet to reduce spam. Find out how your comment data is processed.
Hello, there is an idea to make a cage with a base 60x60cm and a height of cm. Make shelves along the entire height, the space between them is about 30cm high with transitions, previously you did not advise making towers, but wouldn’t having floors solve the problem? A cm-high cage will be extremely inconvenient.
The cage should be such that the top floor is as close as possible to your eye level or slightly lower. Such a base for a large height will indeed not be very convenient, but rather not in terms of area, but in size.
Best answers
A depth of 60cm is not the best solution; it will be difficult for you to reach the opposite side and difficult to hang hammocks. And here, unfortunately, division into floors will not help. The best thing would be at least 75x50, that is, the base is approximately the same area as you intended, but much more convenient for both the rats and you. Price: AliExpress drill stoppers.
Enter your email and receive emails with new homemade products. No more than one letter per day. Login Someone else's computer.
Heat shrink with large diameter AliExpress. AliExpress steel punch set. Similar homemade products. DIY gabion fountain.
Is it possible to work in Moscow with temporary registration?
Do-it-yourself drip irrigation. Installing a water tower at your dacha with your own hands. DIY solar collector made of cellular polycarbonate. Know what you're drinking. Country shower cabin made of gramophone records.
Useful tips
When making cages for laying hens with your own hands, it is worth considering some simple recommendations:
- The tilt and projection of the egg collector must be correct, otherwise it will not be possible to prevent the eggs from pecking, since the birds will reach them with their beaks.
- To connect parts made of metal profiles and galvanized sheets, you can use metal rivets. Thus, the structure can be provided with a minimal anti-corrosion coating, which will extend its service life.
- To simplify the installation process, you can use a special device - a riveter.
- It is better to use PVC pipes for water supply. You can immediately install nipple drinker heads in them.
There are various options for making cages for laying hens, which involve the use of available materials and tools. Having prepared all the necessary drawings, taking into account the number of chickens on the farm, you can begin assembling the structure. Closed housing will reduce feed costs by 15% and increase the productivity of chickens.
0
0
Copy link
DIY galvanized products
If you are interested in the question of how to make a galvanized pipe with your own hands, then you want to save on construction.
Indeed, making homemade tin structures is a smart alternative to factory-made gutters, chimneys and ventilation hoods.
This article will tell you how to practically do the work.
Required Tools
The soft and plastic material is easy to bend, so galvanized pipes are made using simple tools:
- Hand scissors for metal. With this tool you can effortlessly cut sheet metal, the maximum thickness of which is only 0.7 mm.
- Hammer with a soft striker. This role can be played by a wooden hammer or a metal tool with a rubber pad on the striking part.
To work you will need a wooden hammer
Note! A hammer with a metal striker is not suitable in this case. It can deform a thin sheet of galvanized sheet and ruin the product.
- Pliers. Despite its softness, it is impossible to bend thin metal with your hands.
In addition to tools, you will need equipment:
- A workbench used to mark and cut workpieces.
- A calibrating element in the form of a steel pipe with a diameter of 100 mm or an angle with sides measuring 75 mm.
Important! The calibrating elements should be rigidly fixed, since they are used to rivet the joining seam of future gutters or ducts.
In the process of marking workpieces, you cannot do without measuring tools - a metal ruler, tape measure, square or marker (a sharpened steel rod with a hardened end).
Making galvanized pipes with your own hands
The production of casings and cylinders from galvanized steel includes three stages:
- Preparatory. It starts with marking and ends with cutting out the finished “pattern”.
- Molding. At this time, the formation of a given profile of the chimney or ventilation duct occurs.
- Final. At this stage, the opposite edges of the workpiece are connected to each other.
Now let’s look in detail at the step-by-step production of galvanized pipes by hand.
: pipe manufacturing
How to make a galvanized pipe with your own hands?
You can buy galvanized pipes freely, but the cost of such products can be quite high, so the desire to make a galvanized pipe with your own hands is dictated, first of all, by considerations of economy.
At the same time, the production of galvanized pipes does not require the use of special efforts, special expensive devices and tools and any professional knowledge, so any home craftsman who has a set of standard carpentry tools can cope with this.
Cage lighting
To ensure that the egg production of chickens does not decrease, they need to be provided with optimal daylight hours, which should be at least 14-17 hours. In winter, this duration can be achieved using backlighting.
In order to save energy, it is better to use energy-saving lamps or LED lamps. They must be installed in such a way that the cells are evenly illuminated. To automate the lighting, you can install lamps equipped with a timer or photocell.
When installing any lighting fixtures, you must maintain a safe distance from the chickens or use durable shades that will prevent the lamps from breaking.