Pet stores offer a fairly wide selection of cages for rats. But it is really difficult to find a model that is suitable both in size, design, internal arrangement and price. The best solution to this problem is a DIY rat cage. By making it yourself, you can choose a suitable design and make sure that your pet will live in comfortable and safe conditions. Properly selected materials will help you save money and get a durable, comfortable cage without breaking the bank.
At the first stage of creating a cell, you need to decide on the cell model
Cage requirements
There are a number of requirements for a rat cage, because the pet will spend most of its time in it. For a good mood and good health of the rat, you will need to carefully consider the parameters of the rodent’s apartment.
Size
Cage for rodents Savic Freddy 2
Rats are active animals that do not like to sit still. Rodents prefer to constantly explore new things, play and frolic, so it is necessary to provide your pet with enough space to move freely. In order for the fluffy to have space inside the new home, you will need to follow the following rules:
- One adult rat will need 0.18-0.2 m² to feel comfortable. That is, approximately, the length and width of the cage floor should be 36*60 cm. But keeping rats alone is not recommended. Therefore, when settling several individuals, the area of the dwelling should increase in direct proportion to the number of animals. For example, 0.4 m² will be enough for two animals, 0.6 m² for three animals, etc.
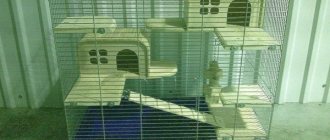
- The height of the cage from floor to ceiling should be at least 61 cm. In this case, it is better to make or buy a multi-tiered house for your pet. This will significantly increase the size of the free space for furry's active games. Also, the height of the cage directly depends on the size of the rat that will live in it. The pet should stand freely on its hind legs, without resting its head on the floor of the upper floor.
- Girl rats are much more active than boys, so the cage for females may be slightly larger than the recommended size.
To keep male rats, a cage with 2-3 floors will be enough. Lazy boys are unlikely to rise higher. And for girls it is better to build a house with 4-5 tiers.
When purchasing or creating a cage with your own hands, you need to calculate the required size based on the available space. Therefore, there is no need to take into account the space for installing play complexes or a holiday house.
Material of manufacture
Some rat owners, in pursuit of originality, provide their pets with housing made of wood or plastic. Outwardly, such options are quite interesting, but not safe. The fact is that rodents have very strong teeth, and they can easily gnaw through materials that are not strong enough.
In such a situation, escape is just a matter of time. Once out, the pet can be seriously injured or run away altogether, and finding and catching a rodent can be quite difficult.
Therefore, the cage should only be metal. Even a rat's incisors won't be able to chew through metal bars. In this case, the owner will not have to constantly worry about the safety of the apartment and the safety of the pet.
Additionally
In addition to the listed basic requirements for the cage, there are several additional ones, for example:
- The door must be closed with a strong lock. Rats are very smart animals, so they are able to independently open simple structures.
- Hygiene inside the cage is easier to maintain with the help of a removable tray. The device is easy to use and allows you to clean at any time. Simply pull out the device and replace the dirty filler with fresh one. It should be borne in mind that it is easiest to care for a plastic pallet. It does not absorb the odors of urine and feces at all. In addition, all contaminants are easily washed off from the plastic.
- The optimal distance between the cage rods is 12-15 mm. If the gaps are larger, the nimble animal will be able to escape. While if the distance between the bars is too small, the pet will feel like he is behind bars.
Also, the cage should not have sharp edges or protruding rods that could injure the animal. Therefore, before moving in a rat, it is necessary to carefully inspect the future home for damage.
Advantages and disadvantages
The advantages of a homemade home are: you can independently choose the shape and size of the cage, how many rats will live in it, how many doors will be located in it, what size they will be and their location. You can also consider for yourself whether a pallet or false bottom is needed. In this case, you can create a cage for a specific place in your room.
The disadvantages are: you will have to think through all the details of creating a cell yourself. Also, fantasies about an ideal cage may not always correspond to the result obtained, since not everyone initially has certain construction skills in using the necessary tools. Building a cage will require a lot of effort and personal time.
What structures cannot be used
Many rat breeders mistakenly believe that any jar or box is suitable for small animals to live in. However, it is not. To protect your furry from stress and discomfort, you should not place your pet in the following types of housing:
- Glass jars, aquariums and terrariums - such containers have solid walls, so soon after moving in the rat will feel a severe lack of air. There are many examples of rodents simply suffocating in aquariums.
- Carton boxes. The rat will run away from such a dwelling at the first opportunity. In addition, air exchange in boxes is also difficult.
- Plastic containers are only suitable for keeping the rat inside temporarily, for example during transport. Because after 30-40 minutes the animal will also begin to suffer from a lack of oxygen.
Also, you should not choose low cages designed for keeping mice or small hamsters as a home for a rat. Rats are quite freedom-loving, so they do not do well in confined spaces.
Briefly about the main thing
Even for inexperienced craftsmen, there will be no problems with the question of how to make a cage for rabbits if you strictly follow all the instructions and recommendations.
To build a rabbitry, the dimensions of the future structure are first determined. It is advisable to start work by completing a drawing. Then a timber frame is constructed.
The next stage is the design of the floor. It can be made of metal profile, fine mesh cage or wooden slats.
After this, the plywood walls of the cage are made. The work is completed by decorating the roof and installing a tray where waste from the cage will fall.
A drinking bowl, feeder and hay barn are installed in the finished cage.
Ratings 0
How to make a cage with your own hands
To place your pet in a cozy house, you don’t have to buy a cage at a pet store. After all, you can make a home for a rat with your own hands. At the same time, you will be able to save money and create a design that fits organically into the interior of the house.
To make a cage yourself, you will need to prepare the following materials:
- durable metal mesh, with appropriate distances between the rods;
- pliers;
- door locks;
- nylon wire;
- side cutters;
- silicone glue;
- aluminum wire;
- PVC sheet.
Making your own cage for a rat can be divided into several successive stages:
- Execution of design drawing. A correctly drawn diagram will make it clear what exactly is required to make the cell, and will also help visualize the work process. In the schematic drawing, in addition to walls and partitions, you will need to indicate the planned locations for the installation of play complexes, a house, feeding troughs, and hammocks. You just need to keep in mind that when making a drawing you need to strictly adhere to the scale, this will help you not make a mistake with the dimensions.
- Manufacturing of parts for the frame. To do this, 4 main sheets are cut out of a metal mesh - walls, roof and bottom. Then, holes are immediately cut out in the places planned for installing the doors. Usually doors are made on each tier and on the roof. This is necessary for convenience when you need to quickly get the rat out of the cage.
- Fastening parts. First, cut the wire into small pieces 5-6 cm long. Using the resulting twigs, the prepared parts are connected by winding, the minimum number of turns is 3-4 pieces. The free ends are pinched with pliers.
- Installation of additional tiers. In a similar way, you will need to attach pre-cut shelves. In this case, the height of the first floor should fluctuate between 25-30 cm. The remaining tiers may be slightly lower - 20 cm each. The height of the upper floor should be at least 35 cm.
- Making a pallet. First you need to cut the PVC sheet. It should be taken into account that the base area should protrude 1 cm on each side beyond the bottom of the cage. The optimal height of the sides is 8-10 cm. All parts of the pallet are connected using silicone glue.
- Door installation. The prepared doors are attached to the mesh using nylon ties. After that, pre-prepared locks or latches are installed.
Once the cage is ready for an animal to move in, you will need to check the structure for any protruding wires, dangerous protrusions, or unevenness. All elements that pose a threat to the pet must be carefully sanded.
Before starting work, it is recommended to paint the mesh. To make paint application easier, you can pre-wipe the rods with a solvent.
All work on making a cage for a rat must be performed on a hard surface, otherwise inaccuracies may occur during installation of the structure. When the rat house is ready, it is better to wait 2-3 days before moving in. Time is necessary for the paint and glue vapors to completely evaporate.
Despite the fact that a homemade cage will cost much less than a purchased one, this design also has significant disadvantages. For example, the process of building a house will take a lot of time. In addition, homemade cages look a little sloppy compared to factory-made products.
Tools and materials
Before you begin construction, you need to select the material to create the cage. Wood is best suited for this, as it is a pure biological material. It is also easy to process.
We cover the frame with rods or mesh with small cells. We paint it well so that corrosion does not occur, and the house will serve you for many years.
Read here - Do-it-yourself trolley - how and from what to build a decorative and tool trolley (135 photos and videos)
We will build the cage using metalworking tools:
A drill will help you drill or connect wood together. Also, for its full operation, drills are needed.
To cut wood, do not forget a saw - a hacksaw.
Check it out here too!
- Do-it-yourself barbecue from a gas cylinder: step-by-step instructions, choosing the optimal sizes and tips for choosing projects (110 photos)
- Do-it-yourself winter chicken coop: design, layout, insulation, heating. 80 photos of warm chicken coops
- How to make a snow blower with your own hands: manufacturing methods, diagrams, drawings, construction options and application nuances (100 photos + video)
Nailing nails of different sizes is done with a hammer. It's also worth taking for work.
To make the product as even as possible, we help ourselves with a level. All measurements are taken with a ruler.
To make your work easier, take a jigsaw. If you don’t have it because you don’t need it, it is advisable to ask your neighbors or friends so as not to spend extra money.
Cutting out metal parts is carried out with special scissors.
For a new design, it is better to purchase locks, latches and hinges in hardware stores to be sure of their strength and your animal cannot get free.
Check it out here too!
- How to make a pump with your own hands - step-by-step manufacturing of a pump and options for making simple and effective pumps (95 photos + video)
- Do-it-yourself hot smoked smokehouse: 100 photos, review of the best drawings, project selection and construction options
- How to make a cage for a parrot: basic requirements, tools and materials, step-by-step photo instructions. Tips from experts on arranging a cage
Arrangement of the cage
Making a cage with your own hands is half the battle. In order for the fluffy to feel comfortable inside, you will still need to arrange your home. To do this, you need to purchase and install the following interior elements:
- Shells for active games . Rats are very active, especially females. These little explorers are constantly exploring their surroundings, playing, and doing physical exercises. Therefore, there must be exercise equipment inside the cage. For example, stairs, tunnels, ropes, running wheels.
- A place to relax . Any cage should have a house necessary for privacy, shelter and rest for the rat. You can make a shelter from fabric, wood, plywood. However, it is best to choose plastic structures. Firstly, this material is strong enough, and a rat will not be able to gnaw through it with its sharp teeth. Secondly, plastic does not absorb foreign odors, so the house will not have to be changed often. It is also recommended to hang 2-3 hammocks in the cage so that the pet can rest in them.
- Feeders and drinkers . There must be at least two drinkers and two feeders inside the cage. It is recommended to put ready-made industrial food into one, and natural food into the other. Also, the number of drinking bowls depends on the number of floors in the cage. If there are more than 2 tiers, at least one drinker must be installed on each floor.
- Filler . The choice of bedding must be approached responsibly, since some materials (for example, pine sawdust) can cause allergies in rats, especially bald and short-haired ones. The best filler options are hardwood sawdust or shredded toilet paper. These materials are natural, absorb moisture well and retain unpleasant odors for a long time.
- Litter tray . Unfortunately, rodents do not often walk small and large strictly in one place, so installing a special container does not always have the desired effect. Training a rat to use a litter tray is a long, tedious task that does not always end in success. Experienced breeders advise placing a litter box in the cage only if the leader of the group uses the toilet. In this case, the neighbors will follow his example.
- Mineral stone . The front incisors of rats tend to grow back throughout their lives. Therefore, rodents need to constantly grind their teeth. A mineral stone would be an ideal option for these purposes, because it is not only a good hygiene product, but also enriches the animal’s body with useful microelements.
Both purchased and homemade cages will need to be constantly kept clean to avoid the appearance of an unpleasant odor and the spread of infectious diseases among rodents.
Feeders and drinkers must be washed daily with boiling water. The pallet needs to be treated in the same way, only once a week. Once a month, the cage should be completely disinfected. But instead of the usual household chemicals, it is better to wash your interior items with regular baking soda. This will help avoid allergies.
Particular attention should be paid to replacing the filler. Rat breeders advise adding fresh sawdust or paper to the tray every 2-3 days. However, if necessary, you need to do this more often - as it gets dirty. Especially if a sick or weak animal lives in the cage.
What should a cage for a rat be, what size, how to make it yourself, how and what to equip it with - these questions are often of interest to novice breeders. However, there is nothing complicated in arranging a home for a rodent. You just need to carefully study the teaching materials, and in a few days the fluffy will be able to move into his new cozy house.
And also a few words about commercially available lethal rat traps (traps)
All of the homemade rat traps described above have an important feature - they allow you to catch the animal alive (the so-called live traps).
However, you can also effectively fight rats using commercially produced traps that will kill rats. For example, among the most popular are the following:
- A standard trap-press (popularly often called a mousetrap) - it can have several modifications;
- Tunnel trap similar to Clean Kill Mouse Trap from Victor;
- Electric rat trap (battery-powered, and there are models that automatically place a killed rat in a special compartment, allowing you to destroy several rodents at once).
In conclusion, it is worth noting that the effectiveness of a particular trap, be it homemade or industrially produced, largely depends on the correct choice of bait. Read more about choosing baits in a separate article: The best baits for rats and mice.
Original wire rodent trap
- How to catch a rat in the house: the most effective ways
- The best types of rat traps for rodent control
- The use of electric rat traps for rodent control
Required funds
The main material for a homemade house is wood: it absorbs bad odors well. Inexpensive plywood, boards or chipboards are easy to process, safe and last a long time. However, wood is not the best option for rats. Rodents love to chew on wooden structures, and the cage will not last long.
A good choice would be a structure made of mesh or rods. Galvanized or enameled metal does not give in to rat teeth and rust. To assemble the parts you need a soldering iron, flexible wire and the following tools:
- Roulette;
- Markers;
- Ruler;
- Nippers and pliers;
- Hammer;
- Metal scissors;
- File.
A homemade rat cage needs a base - a tray. It should be easy to clean and not leak liquid. A plastic tray of the required size or one made from PVC leaves will do. To attach the joints you will need silicone glue. The rest of the materials and tools are sold at the hardware store, including gloves for work.
When selecting a mesh, take into account the size of the cells so that the rodent does not crawl out through them.
If you decide to make a cage from scrap materials using wood, old furniture - a closet or shelves - will help you.
Important stage
A rat cage is more than just a house. This is a place where the animal rests body and soul. That is why it is so important to maintain harmony when building this cage. After all, a lot depends on the rat’s house.
For example, will the pet be comfortable? That's what makes it fun. Will the little rat be playful or withdrawn? Will he live a long and happy life? When building a house, many factors need to be taken into account. Size, shape, toys, add-ons and more. Therefore, it is important to adhere to simple rules: accuracy and quality.
Working with galvanized mesh
In addition to the frame, the rat cage must also contain a lattice, which, in fact, will keep the animal locked up. Otherwise, the apartment of the happy owner will be in chaos and destruction. Just like any house, a cage consists of four walls, a floor and a ceiling. Almost everything except the pallet will be created from galvanized mesh. And this means that you have to work hard. First you need to mark the walls. They should be as tall and wide as a frame. That is, everything should fit together perfectly. The marks have been set - let's get to work. To cut the mesh accurately, you need good and sharp tools.
Wire cutters are suitable for this task. Galvanized mesh must be cut step by step, section by section. You constantly need to measure what is cut off: parallel walls must be the same. Otherwise, the cell will bend in different directions like a wave. But this will not increase comfort in any way, and the appearance will be sloppy. Well, if the walls are already cut, they should be prepared for further use. First, sand down all edges, tips and nicks. Protruding shoots should also be removed. Sanding work can be done with sandpaper. He will do this task well. Secondly, the cut galvanized mesh needs to be painted. This will protect the cage from rusting and from quickly losing its presentation. You can paint the mesh with regular enamel.