It has long been noted that the hamster's favorite toy is the running wheel. Little furry needs it not only as entertainment, but also as a universal exercise machine for maintaining muscle tone. A running wheel for a hamster is bought in specialized stores for animals. But it happens that you come to the store and your eyes widen - that’s how many hamster rides there are! We will tell you how to choose the best toy for your pet that matches its breed and size.
Why do hamsters love running on wheels?
Once in captivity, the hamster no longer needs to worry about food, and its living space becomes limited.
A walking option with such a pet is not suitable, because the animal is small and is hunted by a large number of animals: domestic and wild. And if you do not provide him with additional physical activity, then the rodent will develop health problems: obesity, disruptions in the cardiovascular system, slower metabolism, and decreased muscle tone.
In addition, without entertainment, the animal falls into the blues, becomes lethargic and sad.
Varieties of homemade exercise equipment for hamsters
When making a hamster simulator, you need to immediately think through all the options: determine the dimensions, installation, choose the material. It should be comfortable for the pet and not injure it when running.
By diameter
You should choose the diameter of the circle, paying attention to the dimensions of the animal.
A drum that is too tight creates inconvenience for the hamster, because when running it has to bend strongly, which leads to curvature of the spine.
But if the animal is too wide, it will be difficult for him to spin, and he will soon abandon such an attraction.
According to manufacturing materials
A running wheel for your pet can be assembled from scrap materials. Wood, cardboard, plastic or a tin can are most often used. Since a hamster is a rodent, the design should not contain toxic substances: paint, varnish, etc.
By mounting method
Hamster wheels are attached in various ways:
- On the wall or bars of the cage. This installation saves space, but it has a negative side. During operation, the simulator touches the cage and makes noise. And since hamsters do not sleep at night, this creates inconvenience for the owners of the animal.
- To the bottom of the cage. This type of mount is unstable. The structure can turn over with the hamster.
- On a stand. The most convenient way. The simulator secured in this way produces little noise during operation and is securely mounted. However, it takes up a lot of space.
What materials are suitable?
Even without special skills and materials, you can make a wheel with your own hands.
What materials are suitable:
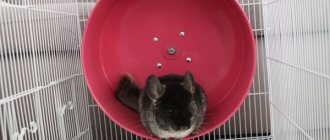
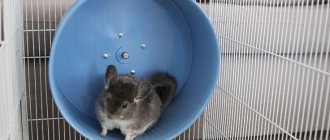
- Durable, tough, high quality plastic bowls.
- Small wooden sticks, maybe for ice cream.
- Flower pots.
- Iron cookie boxes.
Let's immediately outline a few important points:
- The wheel must be safe, that is, it is necessary to pay special attention to the strength of the fastenings.
- The materials used in manufacturing must not be toxic - this condition mainly applies to glue.
- The wheel should not have sharp edges.
The next important point concerns sustainability. The wheel should not wobble along the horizontal axis, otherwise the hamster will not be able to fully maintain balance. It is advisable that there are crossbars or slots inside the wheel that the pet can grab with its paws.
Important! If the wheel is completely smooth inside, it must be placed at an angle. Otherwise, under the influence of centrifugal force, the hamster will be thrown out of the wheel.
Requirements for a rodent trainer
To ensure that the hamster feels comfortable and its owners do not experience inconvenience from the sound of the wheel hitting the cage, the design nuances should be comprehensively considered.
To install a successful simulator you need to:
- its diameter corresponded to the size of the animal;
- the width of the treadmill was optimal for the animal’s paws;
- the attachment of the wheel to the axle was strong and at the same time movable, it turned easily;
- the accessory did not make noise;
- The running surface was comfortable.
Which simulator to choose depending on the type of animal
When choosing the size of the product, it is worth considering the breed of hamsters. For the Djungarian hamster, it is better to choose a small wheel. Its diameter should be 14-16 cm.
The Syrian hamster will need a large trainer. Its diameter should not be less than 18 cm. It is better if it is 20-24 cm.
The width of the track also matters. For the Djungrik, the width of the device should be 5 cm, and for the Syrian - 7 cm. If the path is too narrow, the animal may fall off the simulator.
What you need to know when making a running wheel
It’s easier to buy an accessory for a pet in a store, but making a hamster wheel with your own hands is more interesting. You just need to know the parameters and choose the material.
Optimal diameter
The diameter of the simulator’s circumference must be selected individually, depending on the age and breed of the rodent.
If a Djungarian hamster (adult) requires a diameter of 14–15 cm, then for a young one 12 cm is suitable. But when the animal grows up, the accessory should be changed to a more spacious one.
The Syrian hamster needs more space - 18 cm.
Dwarf rodent breeds easily fit in a drum with a diameter of 10 cm.
Material selection
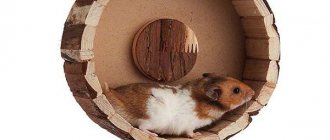
A wooden trainer is more difficult to make, but it is more durable and safer if an animal starts to chew on it. In addition, this design is quieter and looks more aesthetically pleasing.
The metal frame is also not bad, but with prolonged use it soon begins to creak. And the running surface requires additional treatment.
A cardboard structure is assembled faster, but does not last long. Thick corrugated cardboard is used for it. It is convenient for a rodent to run along its surface, clinging with its paws. Since the simulator is lightweight, it is suitable for small breeds of hamsters or young individuals.
A wooden exercise machine will last longer.
Wheel surface
The width of the running surface should also correspond to the size of the pet. For an adult, 7 cm is needed. For dwarf breeds, 5 cm is enough. If the width is made smaller, the rodent will fall from the simulator. If it is more, he will not have enough strength to spin the drum.
The inner surface is made ribbed so that when running the hamster clings to its paws. Therefore, if the cylinder is made of metal or plastic, it is covered with fleecy cloth or pasted over with wooden inserts.
The use of lattice material for the inner surface is also acceptable, but the cells should not be large so that the animal’s paws do not fall into them.
And it is necessary to ensure that there are no extra bumps or gaps on the treadmill, which could cause a fall or injury.
Manufacturing
Before you start making an attraction for your pet, you should at least understand in general terms what a jogging wheel should look like.
- The attraction must be of suitable size. The animal should not be cramped inside, otherwise it will not be able to move comfortably. Excessively large dimensions of the running structure are also undesirable. It will be very difficult for a hamster to spin such a wheel with its paws. For an adult Djungarian hamster, a diameter of 14-16 cm is suitable. For animals of the Syrian breed, it is better to make the attraction larger, since they are larger. For an adult, the diameter of the circle should be at least 20 cm.
- The width of the treadmill also matters. If it is not wide enough, the hamster will periodically fall and may get injured. For small and medium-sized individuals, it is better to make a simulator 5 cm wide. For larger breeds, a track width of 7-8 cm is recommended.
- The running wheel should turn easily. Otherwise, the animal will quickly get tired and may lose interest in its attraction.
- It is worth taking care that the pet does not injure its paws during exercise. This directly depends on the material and structure of the treadmill surface. If you decide to use mesh materials, then make sure that the cells are as small as possible. Otherwise, the hamster's paw may get stuck in them while running. And also, the simulator should not have sharp jags or bumps that the hamster could trip over.
- The treadmill inside the wheel should not be slippery. Therefore, a smooth plastic surface should be covered with thick cloth in advance. The pet will be able to cling to it with its claws.
- When installing the wheel, care should be taken to ensure that it is securely fastened . The animal moves quite intensely on the track, and the shaky structure can topple while it runs. Therefore, the treadmill must be attached to the bars of the cage or placed on a strong and stable support.
Instructions for making a homemade hamster wheel
There are simple instructions to help beginners build their own pet accessory. A homemade wheel does not require large financial costs and does not take much time to manufacture.
Made of wood
This version of a wheel made of plywood and wooden ice cream sticks:
- on a sheet of thin plywood, draw a circle of the required diameter;
- inside the first circle, draw a second one from the same center, but with a diameter 1 cm smaller;
- cut out 2 circles along the lines with a jigsaw so that you get a disk and a ring;
- drill a hole for fastening in the center of the disk;
- cut slots along the edges of the disk for sticks that will serve as a running track;
- cut the ice cream sticks to the required width of the track, taking into account the attachment to the disk and ring;
- Using non-toxic glue, connect the disk, sticks and ring;
- fasten the center of the fastening with a nut and screw to the wall of the cage firmly and movably.
You can secure the drum of the structure using a bearing from an old hard drive, and replace the ice cream sticks with bamboo wallpaper.
From tin cans
For such a wheel you will need a tin container of the required diameter. Its production requires less time.
To do this you should:
- cut the selected container to a height equal to the width of the treadmill;
- drill the center for fastening;
- sand the edges with sandpaper or tape;
- screw the wheel to the cage or use a bearing from an old hard drive.
A drum of this design should be securely fastened and rotate easily without making unnecessary noise.
Be sure to sand the edges.
From cardboard
A cardboard wheel is the simplest option.
On thick corrugated cardboard, draw:
- 2 circles of the required diameter;
- 2 parts for a trapezoidal stand;
- 1 strip, which matches the length and width of a treadmill.
Inside both circles, using a stationery knife, cut holes through which the animal will get inside the wheel. Glue the strip together to form a ring and connect it to 2 circles.
Use a spoke to secure both sides of the wheel together. Attach the parts for the stand along the edges.
DIY plastic wheel
There is another option for a homemade exercise machine not made from metal and wooden structures, but using plastic. You will need a plastic CD case and a curved dowel. The degree of inclination should not be less than 90 degrees. Tools that will be useful are a drill, an awl and a jigsaw.
The method of manufacturing a structure consists of the following steps:
- Take the box out of the plastic and measure a distance of 5 cm from the top of it.
- Then you need to draw a straight line around the entire circumference of the box. Using a jigsaw, moving along the intended path, carefully cut it.
- At the next stage, you will need to take a drill with a diameter of 0.6 cm. Using a drill, you need to make a series of holes.
- Then use an awl to push holes across the entire surface of the box. They should not exceed 0.3 cm in diameter. The distance between the holes themselves is no more than 5 mm. Punctures should be located exclusively on the outside of the structure.
- Go over the cut areas with sandpaper to level the surface for the safety of the animal.
- Then insert the dowel into the center of the box and firmly secure the structure to the cage. To do this, you can use wire or hot glue.
Wheel - generator
Other owners with good imagination use other methods of making a simulator for a pet friend. The wheel in the form of a generator is safe for the animal, and looks very original.
Following the instructions, even a beginner can make it:
The optimal starting tool will be the old drive. Thanks to the convenient design, no additional saw is required, which will simplify the task of assembling the structure. Stages of work:
- Remove the casing from the drive, and then the remaining parts. The task is to go into the house to remove the required bearing.
- If the space between the bars of your existing wheel is too wide, a transparent film will help solve the problem. She needs to wrap the surface of the product tightly.
- The bearing can be attached using a regular disc. Ideally it should be transparent. The disk is attached to the wheel using glue.
- Then attach the previously drawn bearing to the disk.
- Attach the device to the cage in any convenient and, most importantly, safe way for the hamster.
How to train a hamster to run on a wheel
It is impossible to force a hamster to run in a simulator. But if the structure is installed directly into the cage, the pet will immediately understand its purpose.
Sometimes the hamster still does not show interest in the wheel. In this case, you can teach the animal to use the accessory using cunning. Place it inside, cover the holes with paper and start spinning the wheel.
Use a treat by attaching it to the treadmill. The hamster will try to get it by moving its paws over the surface. Having understood how the accessory works, he will subsequently use it for its intended purpose.
With the help of treats, you can teach your hamster to run on a wheel.
Varieties according to the method of fastening
There are three types of simulators for small pets:
- Mounted to the cage wall using wire or special holders. At the same time, such a simulator saves cellular space.
- Model on a stand. This option does not have good stability.
- A product with wheels on a stand is a safer design. In this case, the wheels are located on a stand.
- The running disc is equipped with a stable stand.
After a short period of use, the equipment may create extraneous noise.
In this case, the metal structure can be lubricated with vegetable oil. Some masters create exercise machines with a generator. This device is used to charge a mobile phone. To reduce noise, you can replace the plastic fastener with a bearing. In this case, the simulator will not make noise.
Source
Possible problems
After installing the wheel and using it for some time, minor problems may appear. With adjustments you can get rid of them.
squeaky wheel
The squeaking of the running wheel is a nuisance that becomes more obvious at night. Lubrication will help solve this problem. You need to soak a cotton pad with olive oil and wipe the fastening axis with it. Silicone is also used. It is also non-toxic to the animal.
Hamster doesn't run on a wheel
It happens that the rodent ignored the new toy or stopped running on the exercise machine after short attempts.
There are some reasons for this:
- the design is not assembled according to the size of the animal;
- the wheel is located too high, it is inconvenient for the hamster to climb on it;
- the animal did not like the material from which the simulator was created;
- the hamster is more than 2 years old (due to age, activity decreases);
- your pet is sick or has an injured leg.
The options for why a hamster does not run in a wheel should be considered comprehensively. The problem is not always limited to 1 factor.
Why does your hamster need a running wheel?
- The animal trains its muscles, including the heart, keeps itself in healthy shape and at the same time is in its home cage.
- A cage equipped with a wheel brings his home closer to natural conditions, in which he runs for more than ten kilometers.
- You extend the life of your pet.
- Realizing that he was given a new toy with care for him, the hamster will reciprocate your feelings and will be affectionate and playful.
You can buy running wheels at special pet stores. We will tell you what types of running machines there are for hamsters in our article.
Choosing a Hamster Wheel
If you choose the right running wheel for your hamster, not only the pet, but also its owner will be happy.
It is necessary to pay attention to the following criteria:
- stable fastening;
- free rotation of the drum;
- correspondence of the wheel size to the dimensions of the hamster;
- comfort of the running surface;
- absence of toxic components;
- quiet operation.
Rating of the best manufacturers
It is possible to make a hamster trainer yourself.
And if we consider ready-made models, then such manufacturers as deserve attention:
- Italian company Ferplast, which has a wide range of accessories for all types of hamsters;
- Trixi is a brand offering products for animals.
Darel, Beeztees and Triol will also work.
Exercise machine from branded companies.
How is a purchased wheel worse than a homemade one?
The finished accessory costs from 700 rubles. And for branded manufacturers responsible for quality, the price tag reaches 2000 rubles. and more. It will be cheaper to construct a simulator at home.
Making things for pets with your own hands is a fun activity for one or a family. There is an opportunity to show your imagination.
Another risk with buying a wheel is that some plastic products contain toxic substances. And wooden models are coated with paint for aesthetics. Hamsters often chew on their toys, and products from unscrupulous manufacturers can harm your pet's health.
Wheel using 3D pen
It would seem, why resort to complex solutions if you can draw a wheel using a 3D pen? As in the previous version, making an accessory using a 3D pen is convenient only in theory.
The following problems will occur:
- It will be very difficult for you to make the crossbars the same thickness and place them at the same distance.
- Objects created with 3D pens are not designed for long-term friction, that is, the part of the wheel that comes into contact with the axle will quickly break.
It is worth paying attention to the price of 3D pens! Considering that you will be making a medium-sized wheel and the cost of high-quality 3D pens, most likely you will spend more money on production than on purchasing a ready-made accessory.