Manufacturing procedure
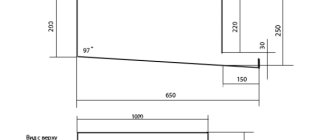
To prepare for work, a diagram is made taking into account all specific dimensions. You can take any drawing of a rack or shelf as a sample. Substitute your dimensions, making sure to check whether the rack will fit in the space allocated for it.
Rack drawing
Don't make the shelves too deep, as this will make cleaning difficult. The distance between floors should be sufficient so that the pigs can stand on their hind legs if necessary. Once the drawing is ready, start manufacturing:
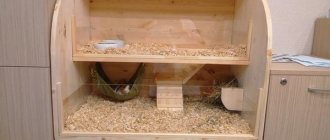
The finished diagram is transferred to the material using a marker with a ruler. To cut parts from wood, use a jigsaw or hacksaw. If necessary, a frame is assembled from wooden blocks. The base and ceiling of the second floor are treated with silicone sealant or other waterproof impregnations. Another option is to purchase plastic trays for the filler, but it is not always possible to find the right size. The side walls are attached to the base using tie screws or self-tapping screws. Large ventilation windows should be installed at the first floor level. The side windows are covered with a mesh, which is secured with screws. The ceiling of the second floor is installed, a hatch hole for the ramp is made in advance. The top floor can be left open for better ventilation; the absence of a ceiling will also make cleaning easier
It is important that the walls are higher than 30 cm, then the pig will not be able to jump out and hurt itself. If you decide to close off the second floor, you can use drop-down plexiglass doors. It is recommended to attach all doors to furniture hinges. Inside the rack you must place several shelters for resting and sleeping, preferably one for each animal
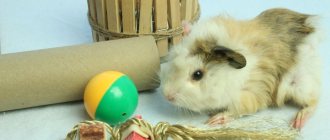
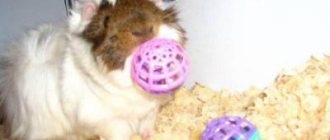
The pig will also like shelves and elevations. Don't forget about toys - otherwise the rodent will take on the parts of its home. In order to make it convenient for the animals to climb to the second floor, it is better to install not a wire staircase, but a ramp - a flat, wide board with glued slats.
Shelf with additional lighting
The rack itself must be placed at a sufficient height, at least 15-30 cm, otherwise the animals will be exposed to drafts.
The solution may be to install the product on a bedside table, which can be conveniently used for storing litter, hay and other accessories for caring for pigs. If there is insufficient lighting at the location of the rack, it is recommended to provide additional lighting. Attach hanging fluorescent lamps on each floor.
Simple wire cutters
The most primitive device is very similar to ordinary scissors. Only one of its cutting surfaces is equipped with a small notch with a sharp edge. Using such a device is easy, provided you have some skill and experience. For young dogs, nail trimming is always stressful. They do not want to sit quietly, they strive to tear the paw out of the owner’s hands and in every possible way complicate the process. So Litbro.ru will not recommend such a gadget to novice dog breeders. The risk of causing serious physical injury to your pet is too great. Well, for experienced owners who have used similar tools more than once, nothing better can be desired. Cheap and very effective.
Cost – 35 – 72 rubles.
More advanced versions of hand cutters offer expanded functionality.
Although their main part, in the old fashioned way, is based on two cutting surfaces. Service additions imply only human convenience. Models with rounded ends, a container for cut claws and lighting have proven themselves very well. The fact is that some dogs have the habit of looking for clipped ends on the floor and eating them. Sharp, bent cuttings can damage the stomach wall and cause bleeding. A small “waste collection” effectively solves this problem.
Price – 636 rub.
Another gadget from the line of simple nippers has comfortable ergonomic handles that allow you to securely hold the tool while trimming nails.
This is important when the animal gets nervous and breaks out.
We pay attention to one more detail - the expansion spring. It fixes the cutting surfaces in the open state, which makes the operation somewhat easier.
Otherwise, the functions of the device duplicate all the features of its predecessors. To properly shorten claws, you must have the skill and achieve unquestioning obedience from your dog or cat.
Cost – 229.93 rubles.
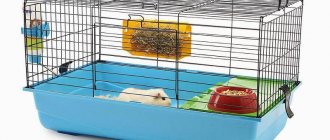
Purchased and DIY cage
Whether to buy a cage for your rodent or make one yourself depends on the financial situation and personal preferences of the owners. If you have the finances, you can choose nickel-plated metal products in the store, which will differ:
- long service life;
- spacious dimensions;
- attractive appearance.
Such a cell is almost impossible to damage. As for the materials for making terrariums, the following is used:
- organic glass;
- getinax;
- synthetic materials.
Ryzhik in a hammock
All these materials are durable, hygienic and safe. In addition, they are resistant to mechanical damage and chemical elements.
The bottom of the cage must be strong. It is best if it is made of high-quality and environmentally friendly plastic.
Attention! Cages made from combined materials are not particularly durable. Despite their low cost, it is better to opt for other products
As for the option of making a cage yourself, here you can build a structure of any size and from different materials.
The advantages of making a rodent cage yourself include:
- saving your own savings. You can make a spacious and easy-to-use house for a whole family of guinea pigs;
- interesting shapes and designs. When manufactured independently, the product can be given any shape and different types of structures can be made. This can be a two-level housing with stairs and various shelters;
- aesthetic appearance. Properly designed housing for rodents will harmoniously fit into any room interior.
Another advantage of a homemade cage is that over time you can improve the design by adding new levels or a house.
As for the shape, the animal cage can be made in the shape of the letter L, vertical, horizontal and even multi-story. From the remaining materials after assembling the cage, it will be possible to make a house, a crib, or a feeding trough.
The main thing is to competently develop a drawing, select materials, and stock up on free time.
The advantage of a spacious cage
Some breeders believe that the advice to make a cage no longer has any scientific basis. However, the large area of the cage will allow the animal to move actively and not get bored even when the breeder does not have enough time to let the animal walk around the apartment. In the cage-aviary, the pig can play, run, explore the territory and even just go eat - it will take her time. Movement is a good prevention of diseases of the lungs, heart, kidneys, and stomach. A large cage will also allow each pig to have its own corner and its own zone of comfort and relaxation. This means fights between animals will stop. The area of the pig's house also plays an important role when the female is expecting offspring or already has offspring.
A larger cage is easier to keep clean. It is much more convenient to clean, change food and bedding. Watching animals frolicking in an enclosure is also much more convenient and interesting.
The cost of creating a children's house yourself
The total price for homemade children's houses, or more precisely, for the purchase of building materials from which they are built, will ultimately be much more modest than the amounts requested by sellers for similar children's areas of poorer quality, no matter what model you choose to build yourself.
Finished design
So, for example, the cost of the house shown in the picture is approximately 6-7 thousand rubles, while buildings made of similar materials of similar size and very average comfort, sold in mass production, will cost on average one and a half to two times more.
Vintage basket
Here we are dealing with a representative design in the style of modern rural fashion. Best suited for lovers of cycling or short distance travel on scooters. The basket itself is woven from flexible willow and equipped with an openwork wire lid, which prevents the cat from wanting to get out while moving. At the first glance at such a carrier, one is reminded of idyllic pictures from centuries ago, when food from the market was transported in a similar way on bicycles. The entire structure is conveniently attached to the steering wheel using leather straps and does not require much time for preparation.
The advantage of the option under consideration is, of course, its original design and originality. The downside is limited functionality. Although, if desired, the basket can be used for its intended purpose.
Price – 1,128 – 1,708 rubles.
How to make a rack with your own hands
Choosing material
Metal racks are appropriate in the country if pigs are kept in a barn or garage during the warm season. At home, it is better to give preference to natural materials:
Deciding on the sizes
The depth of the shelves can be different, at the request of the master from 25 to 50 cm. If the width is more than 50 cm, it will be more difficult to reach the wall, and cleaning will be more difficult. The length of the shelves should ideally not exceed 90 cm, since rodents along with all their belongings can weigh quite a lot, and the shelf can bend and break under the weight. The distance between floors can vary from 30 to 60 cm.
In order to provide for everything, it is necessary to make a drawing of the future product in advance.
Assembling the rack
It is recommended to use a level during assembly. Assembly begins from the base; its construction will require a thick board along the length of the finished product. The racks are installed at a distance of about 60 cm. The frame of the rack is fastened with self-tapping screws, the corners are reinforced with strips.
Wooden boards, chipboard or OSB board are suitable for making shelves. The optimal thickness of the shelves is 2.5 cm. If desired, you can cut holes in the shelves and install ladders between them for the animal. The size of the hole should correspond to the size of the pet.
The side walls are made of furniture board, chipboard or plywood. Grooves are cut into them, shelves are installed and fixed with self-tapping screws.
If a back wall is needed, it can be made from a sheet of plywood.
You can decorate the structure using laminated chipboard and wooden figured plinth.
We sew a T-shirt with raglan sleeves
Today I would like to tell you how to sew a T-shirt with raglan sleeves.
For me personally, such a T-shirt is easier to assemble than a regular one. Even in terms of time, I still spend longer with a regular T-shirt than with a raglan one.
- chalk or special marker;
2. Cut out the details of the T-shirt from fabric.
I used two types of fabric. There is an interlock with a zigzag print on the back and front, and a white drawstring on the sleeves. We cut out one front piece, one back piece and two sleeve pieces.
3. Product assembly.
HOW TO SAVE? Shopping at FIX PRICE for guinea pigs / DIY SENNYK lifehack
We pin the sleeves to the back of the product. The pattern shows that the sides of the sleeves (which are attached to the back and front) have different lengths. The longer side of the sleeve is pinned to the back of the T-shirt, the shorter side is pinned to the front. I pin the sleeves to the shelves in one direction. Those who are uncomfortable with teasing can baste them or use a method that is convenient for themselves.
How to sew a hammock for a guinea pig: DIY / SvinkiShow
4. Stitching seams.
Seams can be sewn both on an overlocker and on a regular machine using a zigzag seam. We sew the sleeves all in one direction.
After we have sewn the sleeves, we proceed to the side seams. Just like the shoulder seams, we pin the material with pins, aligning the shoulder seams so that after stitching the underarm seam looks smooth and beautiful.
How to make a house for a guinea pig - choosing material
To prevent the sleeve seam from running away, I tie the tail threads with a regular knot and cut off the excess.
5. Finishing the collar with bias tape.
For me, it’s more convenient to measure bias tape not using a measuring tape (measure the armhole of the neckline, then put this measurement on the tape, etc.), but to measure the tape itself directly on the neckline, slightly stretching it (the tape). After I measured the binding, I add 0.5 cm to the seam and form a ring from it.
After the binding is formed into a ring, fold it in half and pin it to the neck of the product. And we can sew it on an overlocker or a machine.
Having sewn the binding to the neckline, we either iron it or carefully stitch it to the front and sleeves using a machine with a straight stitch.
6. Processing of the bottom and sleeves of the product. End of work.
From the wrong side, fold and iron the hem allowances at the bottom of the product and on the sleeves. Then we sew them either on a flat-stitch machine, or with a double needle or with an elastic seam on a regular machine.
Our T-shirt is ready