Hamsters, leading a very active lifestyle and mainly at night, certainly cause trouble for their owners, preventing them from sleeping soundly at night. If you are faced with similar problems, then it’s time to give your pet a silent exercise machine that will help him splash out energy and not disturb your sleep. Follow the simple instructions on how to make your own hamster wheel at home, so your pet can lead a quiet but active night life.
What does a hamster need a wheel for?
Practice shows that the vast majority of hamsters are active at night, not counting rare exceptions that prefer a daytime lifestyle. A silent running wheel will be an excellent addition to a rodent’s cage, providing it with the ability to run as much as required by the steppe nature of the animal, which is accustomed to running more than ten kilometers per night, getting its food. At the same time, the pet’s constant activity will become invisible to the owners, since a hand-made wheel will be a full-fledged analogue of a store-bought one that will not create any extraneous sounds.
Before you start designing a hamster simulator, you need to get acquainted with the basic requirements for running wheels, which we will discuss below. An important point will also be preparing the rodent for a new object in the cage, since the animal will first have to be taught to use the wheel, and then accustom it. So, first things first.
To prevent the hamster from getting injured, the wheel must be the correct size, without sharp edges.
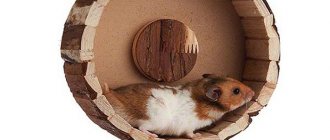
For the hamster’s convenience, the surface of the future wheel should be smooth and contain small notches so that the rodent can stay on it and move without slipping. An acceptable option would be a ribbed surface made of corrugated cardboard. If slippery metal will be used as the main material for the simulator, it must be wrapped in soft cotton cloth, securing the casing with glue.
A quality wheel should look like this:
- silent in operation;
- suitable diameter;
- with serifs on the inside;
- easy to rotate;
- do not create vibrations;
- firmly fixed.
The diameter of the wheel must be selected according to the size of your pet. Do not forget that for large breeds the dimensions must be at least 18 cm, and for dwarf breeds - at least 12 cm. You can use a large tin can or a thick piece of cardboard as a base. Pay attention to the surface of the product: ideally there should be no dyes on it at all. If the running wheel is planned to be made of cardboard, then the base can be a regular CD, which must be glued to the bottom of the container. It is advisable to take a transparent disk for this purpose.
Basic requirements for the wheel base:
- When choosing a metal circle as a frame, ensure that the product has smooth edges to protect the hamster and yourself from possible cuts. It is better to cut a tin bottle or other container with special scissors designed for metal;
- The rotating element of the wheel can be made from a spindle taken from a hard drive, or you can use the motor of an old disk drive. It must be tightly attached to the bottom of the container with hot glue;
- if thin tin is used as a base, prepare an additional bottom made of plastic or wooden strips fixed transversely to the surface. Make sure that the spindle is attached exactly in the center of the product, which will ensure quiet operation. Even a millimeter error will lead to the opposite result.
When manufacturing, pay special attention to the wheel fastening.
To conclude the topic about a high-quality home wheel, it is important to say about the fastenings. When making a machine from metal, you only need to glue the spindle and fix the wheel on the cage, so there is no need for separate fasteners. But in the case of a cardboard product, the walls will need to be fixed along the bottom. For this purpose, it is necessary to make small holes around the perimeter of the bottom of the workpiece, into which wall projections will then be inserted. You can attach the wheel to the cage walls with wire or plastic ties. To do this, use the free space in the spindle, attaching wire to them and securing its edges on the outside of the cage.
Hard disk running wheel
A domestic rodent will certainly appreciate an item that the owner will try to make comfortable for hamster training, and will devote most of its time to running exercises. To make a simulator with your own hands, you must follow the conditions of the sequence of work. So let's start tinkering:
- We take out the old hard drive, take a screwdriver and remove the cover from it.
- We remove all the bolts that hold the mirror plate.
- We take out the spindle and unscrew the bolts, disconnecting it from the holding frame.
- We cut the tin container around the circumference, having calculated the required diameter in advance.
- We attach cotton fabric (or other material with a porous structure) to the glue on the inside of the product.
- We attach another layer along the entire bottom so that the wheel can become silent.
- Next, fix the spindle at the bottom.
- All that remains is to install and fix the finished wheel to the walls of the cage.
- We take out a plastic box and measure the distance 5 cm from the top.
- We draw an even line along the entire circumference of the box and, moving along the measured line, saw it using a jigsaw.
- In the next step we will need a drill with a diameter of 0.6 cm, with which we begin to make holes using a drill.
- Next, use an awl to make small holes around the entire circumference of the box, not exceeding a diameter of 0.3 cm. Maintain a distance between them of about 5 mm. We make punctures exclusively on the outside of the product.
- We go through the cut areas with sandpaper, smoothing out sharp roughness.
- We insert the dowel into the center of the box and secure the wheel to the rodent cage.
Video: how to make a hamster wheel from a hard drive with your own hands
By the way, in addition to the metal body, you can make a running drum from plastic objects. To do this, you need to stock up on a plastic CD box and a curved construction dowel with a nail (90° bend). The tools you will need are an awl, a jigsaw and a drill. The conditions of the task are:
A little about ferrets
Recently, more and more often animal lovers choose a ferret as a pet. This animal is very funny, cute and to some extent exotic. And this choice is quite logical. Firstly, ferrets are very cheerful creatures, you won’t get bored with them, there is no end in sight to the games and fun. Secondly, the ferrets are very compact, for some this is a significant advantage, since they can be very easily transported on various trips.
Ferrets, despite the fact that they are nocturnal animals, can quite easily adapt to the life rhythm of their owner. There is no need for daily walks with these animals, like, for example, with dogs. If you decide to take your ferret for a walk, getting him accustomed to a harness won’t cause much trouble. They treat the owner friendly, get used to it well, unlike cats, but without fanaticism, like dogs. It is also worth noting that ferrets are distinguished by their extraordinary inquisitiveness of mind, intelligence and cunning.
Among representatives of the same species, you can find animals with completely different manifestations of character, therefore, you can choose a more suitable type for yourself, from super active to calmer.
Tips and tricks
In addition to the basic rules for building a hamster cage, there are additional recommendations that are no less important:
- The materials used must first be thoroughly washed, disinfected and cleaned of excess - stickers, paint residues.
- Before starting work, you need to think about the structure of the cage: plan the toilet, feeding areas, a free part for games and physical training, as well as a place for the hamster to sleep and rest. All basic things should fit inside, and large structures such as labyrinths can be brought outside.
- All parts must be firmly secured. It is better not to use small fragments or place them on the outside of the home - in a place inaccessible to the hamster.
- The cage must be made in such a way that its design does not interfere with regular cleaning. You can make it partially removable, which is especially important for multi-level houses.
- A lightweight house made of plastic or bottles can be used as a carrier.
- For large and heavy housing, it is worth making additional reinforcements between the main part and the pallet. Under heavy weight, the sides of the bottom may become deformed, causing the cage to fall.
- Locks must close doors securely.
- When constructing the cage, it is allowed to use glue, but all parts must dry before moving the pet. It takes about a week for complete drying.
- Hamster cages should be placed on a flat, stable surface, such as a low table. The house can be placed in the corner of the room or on an insulated balcony.
- When making a house, you can use a ready-made frame - an unnecessary cabinet or cabinet.
Making a hamster cage with your own hands will require some effort and construction skills. Such a house will not only be cheaper than a purchased one, but will also meet the technical requirements and personal ideas of the owners about an ideal home for pet rodents.
How to train a rodent to run
Some hamsters don't understand why they need a wheel until they try to run in it. Others become lazy over time and don't want to move much. Experts recommend using the following tricks:
- Lure with a treat. You won't give your hamster a choice if you put food directly into the drum. You need to do this for several days in a row until the rodent itself begins to come and climb into the wheel.
- Blocking the exit. Take a piece of cardboard or a piece of wood and cover the entrance to the wheel with it when the hamster gets into it. He will only have to move in one direction, causing the wheel to rotate.
Possible problems
Even using such a simple design can cause difficulties. Most often, hamsters refuse to run in a wheel. It also happens that over time the wheel begins to squeak.
The wheel squeaks
The structure may creak as a result of prolonged use. The parts deform over time and come into contact with each other during rotation. The solution is to lubricate the surfaces with oil. If a new wheel squeaks a lot, it may be defective.
Hamster doesn't run on a wheel
This problem can occur for several reasons:
- The rodent doesn't like the wheel. Try replacing it with a machine made of a different material or with a different design.
- The hamster has a hard time turning the wheel. This may happen due to the age of the animal. Rodents older than 2-3 years are considered old and they lose the desire to move a lot.
- The hamster has an injury. It may also happen that the rodent injured its paw or hit itself. Find out by watching him. If he used to be cheerful and active, but suddenly suddenly stopped running and playing, you should take him to the vet.
Step-by-step instructions: how to make a hamster wheel with your own hands at home
Before starting the manufacturing process, you need to study the structural features of a hamster wheel, decide on the size and other characteristics. This will help you make the perfect wheel that your rodent will definitely love.
Running wheel diameter
The most important thing is to choose the right wheel size so that your hamster can run comfortably in it:
- a diameter of 12 cm is suitable for a young hamster;
- for an adult rodent 16-18 cm;
- jungarika – 10 cm.
Important! As your pet grows up, he will need to change the wheel to a larger version.
Surface of the running wheel
The hamster should be comfortable running in the simulator. Therefore, the inner surface must be made ribbed. The rodent will be able to grab onto it with its paws and rotate the cylinder. Corrugated cardboard works well for these purposes. If you are making a wheel from plastic or metal, you will need to cover the inner surface with fabric.
Made of wood
You can make a wooden wheel according to the following instructions:
- Take a thin board and draw 2 circles with the selected diameter.
- Cut out one of them whole, and inside the second, draw a circle with a diameter less than 1 cm and cut it out too.
- On a solid circle, make a hole in the center and several more small holes around it.
- Take the popsicle sticks and cut them so that they are 5-6 cm long.
- Connect both parts using sticks and a hot gun, creating a wall for the rodent to run along.
- Using a nut and screw, screw the wheel to the wall of the cage.
From a hard drive and a jar
You can make a hamster wheel from a can in half an hour using improvised means:
- Select a container of the required diameter.
- Measure 5-6 cm from the bottom along the wall and cut off the excess.
- Sand the edges and interior surface with sandpaper.
- Take a cocktail tube and connect 2 points of the circle with it so that it runs through the center.
- Glue the edges with tape or a glue gun.
- Make holes in the center of the bottom of the jar and in the middle of the straw.
- Stick a wooden skewer into them.
- Check that the wheel rotates freely along the axle.
From cardboard
It’s as easy as shelling pears to make a wheel out of cardboard paper:
- Draw on cardboard and cut out blanks for the future wheel with a stationery knife: two circles of the same size with holes for the rodent, 2 parts in the shape of the letter “P” for attaching the wheel, a strip 5-6 cm wide and equal to the length of the circle.
- Bend the strip, connecting its edges, and glue it between the circles.
- Take a knitting needle and thread it through the centers of the circles.
- Attach the sides.
- Bend the ends of the knitting needles so that the circle does not fly off.
Nuances in making a running wheel
When working on the simulator, the following points must be taken into account:
- the wheel must rotate freely around its axis;
- it must be stable and not lose balance when a hamster gets into it;
- Don't forget to trim the edges so your pet doesn't get hurt.
Important! Remains of glue must be removed from the surface so that the rodent does not accidentally swallow it.
Cardboard exercise machine
Making a wheel from this material is absolutely not difficult; it may not last long, but it will last for a while. The work process itself is within the capabilities of even a junior schoolchild. For this craft you will need:
- a small bushing made of thin metal;
- sheets of cardboard;
- paper knife or scissors;
- pencil;
- ruler.
First you need to make the blanks. Draw 2 circles of the required diameter on cardboard with a pencil, then cut them out with scissors. A slot is made on one of the parts through which the hamster will climb into the exercise equipment. After this, first draw and then cut rectangular holes along the edge of the circle at a distance of 5 mm from the edge.
Now start making the track. It is cut out of a strip of cardboard of the required width, leaving protrusions at the edges for quadrangle slots on the circles. After this, cut out the base and the wall to which the simulator will be attached.
During assembly, the track is inserted with protrusions into grooves on the circles. Then the base and the wall are fastened together. A hole is made in the center of the wall for a metal sleeve and the part is installed in the resulting hole. After this, the resulting wheel is put on the hub and secured at the ends with plugs so that the structure does not fall apart. This completes the assembly process. We can only hope that the hamster will not chew his toy into small pieces so quickly.
Types of simulator and mounts
Running wheels differ in their inner surface. It can be solid, lattice or mesh. It is safest to choose wheels without holes so that the hamster's paw cannot fall into it.
Wheels also differ in the type of fastening:
- to the cell wall. Saves space in the hamster's home, but when used it knocks on the rods or board.
- To the bottom of the cage. Such exercise machines are unstable and can tip over if the rodent starts to run.
- On a stand. The best option for hamsters if space in the cage is not limited. Very stable and causes minimal noise.
Cardboard
This simulator is very budget-friendly, but not durable. In addition, the hamster can chew on it significantly during a break between runs. Anyone can make such a wheel, even without special skills.
Silent
Many people choose this type of exercise machine because hamsters love to run at night. The noise from the rotation of the wheel can be heard all night and interfere with sleep.
Thanks to the special design, the parts do not touch each other and do not create extraneous sounds. But it is worth noting that such wheels are much more expensive than regular ones.
Wood
A wooden treadmill keeps the environment around the rodent environmentally friendly. This is a big plus for his health. These wheels are a little more expensive than regular ones, but you can make them yourself.
Features of the structure of the running wheel
Any running wheel consists of a cylinder, which is mounted on an axle.
When choosing a simulator, it is important to ensure that it rotates evenly and does not deviate to the sides. The wheel stand must be stable
Otherwise it will turn over.
Disadvantages of purchased hamster wheels
The main disadvantage of purchased wheels is their cost. A medium-sized exercise machine will cost no less than 700-1000 rubles. Plastic wheels may contain harmful impurities that will worsen the hamster's health.
Often, purchased hamster wheels are coated with paint that a rodent can tear off with its teeth. If it gets into the animal's stomach, it can cause intoxication. Therefore, things made with your own hands are sometimes safer for your beloved pets.
Instructions for making a homemade hamster wheel
There are simple instructions to help beginners build their own pet accessory. A homemade wheel does not require large financial costs and does not take much time to manufacture.
Made of wood
This version of a wheel made of plywood and wooden ice cream sticks:
- on a sheet of thin plywood, draw a circle of the required diameter;
- inside the first circle, draw a second one from the same center, but with a diameter 1 cm smaller;
- cut out 2 circles along the lines with a jigsaw so that you get a disk and a ring;
- drill a hole for fastening in the center of the disk;
- cut slots along the edges of the disk for sticks that will serve as a running track;
- cut the ice cream sticks to the required width of the track, taking into account the attachment to the disk and ring;
- Using non-toxic glue, connect the disk, sticks and ring;
- fasten the center of the fastening with a nut and screw to the wall of the cage firmly and movably.
You can secure the drum of the structure using a bearing from an old hard drive, and replace the ice cream sticks with bamboo wallpaper.
From tin cans
For such a wheel you will need a tin container of the required diameter. Its production requires less time.
To do this you should:
- cut the selected container to a height equal to the width of the treadmill;
- drill the center for fastening;
- sand the edges with sandpaper or tape;
- screw the wheel to the cage or use a bearing from an old hard drive.
A drum of this design should be securely fastened and rotate easily without making unnecessary noise.
Be sure to sand the edges.
From cardboard
A cardboard wheel is the simplest option.
On thick corrugated cardboard, draw:
- 2 circles of the required diameter;
- 2 parts for a trapezoidal stand;
- 1 strip, which matches the length and width of a treadmill.
Inside both circles, using a stationery knife, cut holes through which the animal will get inside the wheel. Glue the strip together to form a ring and connect it to 2 circles.
Use a spoke to secure both sides of the wheel together. Attach the parts for the stand along the edges.
What materials are best to make it from?
You can make a wheel from many available materials:
- Tree. Wooden wheels are made from small boards. Ice cream sticks are perfect for this purpose. You will also need a rectangular wooden beam and metal wire. Such a wheel turns out to be durable and requires virtually no financial costs. But if it is not weighted down from below, then it can turn over while running, since it weighs very little.
- Tin can or disk. To make it you will need a tin can of the required size, a screwdriver, a knife for cutting metal, a glue gun, and wire. The design is also quite durable. But if the edges of the jar are not treated, the hamster may cut himself on them. In addition, this design does not look very aesthetically pleasing.
- Cardboard. This wheel is suitable for small rodents, as it is not durable. The design is very simple to make; even a child can do it under the supervision of an adult. Be sure to choose a thick cardboard so that it does not sag under the weight of the hamster.
Have you decided to make a wheel from natural materials?
What should a good running wheel look like?
The requirements for selecting a place for an animal are to comply with the following recommendations:
Hamsters are afraid of drafts. They do not like places that are too hot or cold. Dampness. It is not recommended to place the cage on the floor or windowsill. It is important to place the cage in a smoke-free room.
The bottom of the cage must be covered with dry wood sawdust. The hamster should be kept active by placing it in a cage:
- Climbing ropes.
- Swedish wall.
- Running wheel.
- Labyrinths.
These devices will help your pet meet its motor needs, which will help prolong its life and improve its health.
Is it possible to make them yourself?
You can make tunnels and labyrinths yourself. The simplest, one might say, budget option for such a hole is a construction made of cardboard. Of course, it cannot be used constantly; sooner or later, it will have to be renewed or replaced altogether. Due to the availability of the material, this is actually not critical.
In addition, making a cardboard tunnel with your own hands is a wonderful joint activity for adults and small family members. There are no limits to children's imagination; adults only need to correct their work, imperceptibly correct it and direct it towards creating a cozy mink that is truly acceptable for pets. Children eagerly decorate the building
It is important to ensure that you do not use decorations that are dangerous for rodents, such as rhinestones, and you will also have to exclude some adhesives
The main advantage of such a homemade labyrinth will be its uniqueness. With some experience, you can create replaceable modules that can be periodically replaced or rearranged; this will eliminate habituation, and the pet will constantly explore the proposed structure, which will bring him great pleasure.
The material for creating the labyrinth will be boxes made of thick cardboard, for example, shoe boxes. The set of necessary tools is not so wide: scissors, ruler, compass, pencil, glue or tape.
The largest box can become the basis of a labyrinth. You can draw a plan on its inner surface. The side walls will become its walls. Various kinds of partitions are made from the material of smaller boxes; passages in the form of round holes need to be arranged in them at different but accessible levels for the animal. Inside individual “rooms” various ladders, cubes, and dead-end chambers can be arranged.
The boxes can be combined with tubes, such as toilet paper rolls. Thus, a structure with various passages and chambers can be created in which the pet can spend several hours a day.
Craftsmen build tunnels and labyrinths even from plastic bottles. However, this material has a significant drawback - it is very slippery. Rodent claws cannot cling to a plastic surface, so it is better to combine bottles with a cardboard or plywood base. Bottles can be cut in half and mounted on a rougher surface. If a multi-level hole is not intended, the bottles can be securely connected using tape. One of the undeniable advantages of such a labyrinth is transparency.
PVC plumbing pipes offer the widest scope for imagination and at the same time reliable execution; a wide variety of connections will allow you to create masterpiece structures. It is necessary to make small holes in the walls of such tunnels for ventilation. The tightness of their connections can cause discomfort for rodents.
The basic rules for creating artificial labyrinths are quite simple, there are not many of them.
- Moderation. Overloading the elements of the labyrinth will quickly tire the explorer and he will lose interest.
- Safety. The use of toxic adhesives is unacceptable. The hamster will definitely try out the labyrinth design. It is also advisable to protect it from contact with tape.
- Availability for observation. The animal, while in the maze, should not disappear from the owner’s field of vision. All its movements must be observable, and the owner must always imagine where the pet is currently located. Some hamsters are prone to escape, it can be difficult to get them back, and in the process of being “AWOL” they are exposed to serious dangers.
To learn how to make a tunnel for a hamster from plastic bottles, see below.
How to choose the right wheel for a hamster?
The pet store offers a wide range of pet products, including a variety of wheels for a hamster cage. But it is worth noting that when choosing this type of device you must be guided by the following basic rules:
- Pay attention to the size of the wheel.
- When choosing, be guided by the size and age of the pet.
- There should be no creaking or hesitation when the wheel mechanism rotates.
- Pay attention to the structure of the wheel itself; it should be solid, without gaps, since the hamster can injure its paw.
Rotation mechanism material:
- Environmentally friendly wooden mechanism and manufacturing details.
- Stainless steel types.
- Plastic.
Let's start making a running wheel
Each owner of small pets strives to provide them with decent care and give them all their love. But it is worth considering that the hamster is a nocturnal animal, so it is necessary to ensure the need for its activity. By following our recommendations, you can create a wonderful hamster wheel with your own hands without spending a single penny.
How to make a hamster wheel from a computer disk and a tin can
DIY materials:
- The computer internal (system) disk is in a faulty state.
- Can.
- Insulating tape.
- Glue Moment.
- Wire.
The first step at home is to unscrew the lid of the broken computer hard drive, disconnect the metal cylinder, then cut the jar so that its height is about seven centimeters in height. After all the manipulations have been done, glue a device to create a rotational movement from the broken hard drive to the bottom of the cut can. To ensure the safety of the hamster, the sharp edges of the jar should be lined with cloth and insulating tape.
Cardboard wheel
This is one of the simplest options for creating a wheel. To complete the work you need the following materials:
- thin metal tube, knitting needle;
- cardboard sheet;
- scissors;
- glue;
- ruler;
- compass.
At the first stage of work, you need to draw two identical circles using a compass, then you need to trim the base and wall of the wheel. Cut rectangular holes on the circles. Next, you need to cut a long strip of cardboard. These will be paths cut out of cardboard paper. After all these steps, let's move on to assembling the device mechanism itself. We take the two resulting circles, glue our straight path between them, then determine the center and pierce the wall with a knitting needle. Then we attach the mechanism to the cage using wire so that the wheel does not come off.
Wheel made from a plastic bottle
This bottle hamster wheel method is pretty basic. To make a hamster wheel, you will need the following materials:
- plastic container;
- dowel;
- nail.
Trim the plastic container so that the height is about seven centimeters in height. Then take a dowel with a diameter of one centimeter and a curved nail. Insert the nail into the dowel. Make a hole in the center of the bottom of the bottle and insert the head of the nail into it. Secure the rotating mechanism in the cage with a dowel.
How often should the cage be washed?
Regular cleaning guarantees a healthy atmosphere inside the cage and the absence of extraneous unpleasant odors. Contaminated litter in the tray is cleaned daily.
The time for “general” cleaning is once every 2 weeks. Major cleaning consists of successive stages.
- Place the dwarf in a temporary home.
- Discard all filler from the tray. Leave a small handful of the contents so that the hamster's smell does not disappear.
- Throw away rotten food from your hamster's supplies. It is impossible to clean out the entire “pantry”, since the loss of savings will result in severe stress for the dzhungarik.
- Wash the tray with warm water. Use baby soap and animal shampoos as detergent. Do not use cleaning products with an aggressive composition (white, powder).
- Use a sponge soaked in soapy water to treat the rods. Wipe all attributes and accessories with a dry cloth.
- Wait until completely dry. Pour in new filler and mix it with a handful of old.
- Letting the dwarf into his clean home.
Varieties of homemade exercise equipment for hamsters
When making a hamster simulator, you need to immediately think through all the options: determine the dimensions, installation, choose the material. It should be comfortable for the pet and not injure it when running.
By diameter
You should choose the diameter of the circle, paying attention to the dimensions of the animal.
A drum that is too tight creates inconvenience for the hamster, because when running it has to bend strongly, which leads to curvature of the spine.
But if the animal is too wide, it will be difficult for him to spin, and he will soon abandon such an attraction.
According to manufacturing materials
A running wheel for your pet can be assembled from scrap materials. Wood, cardboard, plastic or a tin can are most often used. Since a hamster is a rodent, the design should not contain toxic substances: paint, varnish, etc.
By mounting method
Hamster wheels are attached in various ways:
- On the wall or bars of the cage. This installation saves space, but it has a negative side. During operation, the simulator touches the cage and makes noise. And since hamsters do not sleep at night, this creates inconvenience for the owners of the animal.
- To the bottom of the cage. This type of mount is unstable. The structure can turn over with the hamster.
- On a stand. The most convenient way. The simulator secured in this way produces little noise during operation and is securely mounted. However, it takes up a lot of space.
Running wheel with generator
Other owners have armed themselves with various wheel-making techniques and come up with a ball-bearing hamster wheel with the added bonus of a generator. Making such a wheel is not very difficult if you follow the instructions step by step. So:
There is another simple way to make a homemade wheel for a rodent, but here it is important to have existing manual skills, since the simulator will have to be cut out of wood materials. We will need 2 pieces of plywood, from which we need to cut 2 circles of the same size. Do not forget that we select the diameter of the circle in accordance with the size of the animal. Next, we connect the resulting blanks to each other, intertwine them with twigs and secure them to the walls of the cage.
Making a toy with your own hands
You can make an attraction for the fluffy miracle yourself. The idea will especially appeal to middle school-age boys who already know how to work with some tools and materials. Involve your kids in creating an exclusive simulator for a cute animal - they will really like the process itself and your trust.
There are several options for creating a simulator. They use different materials, and the level of complexity also differs. We will tell you how to make a hamster wheel with your own hands in different ways.
Toy made from a hard drive and a jar
Thrifty owners rarely throw away broken hard drives. After all, they can be used in some way, for example, to build an attraction for your favorite furry.
You will need:
- damaged hard drive;
- wide metal can;
- insulating tape;
- upholstery material;
- Super glue;
- wire.
In the process of creating a toy, you will need the following tools: scissors for cutting metal, a screwdriver, writing utensils for applying markings.
The instructions will tell you how to make a hamster simulator:
- Unscrew the screws on the faulty hard drive and remove the cover.
- Disconnect the spindle (metal cylinder).
- Use a marker to mark the jar so that the height of the edge from the bottom is 5 cm (for dwarf hamsters) or 7 cm (for Syrian hamsters).
- Using metal scissors, cut the can along the marked outline.
- Now glue the spindle to the bottom and wait for it to dry.
- Cut a piece of fabric to cover the running surface. Polystyrene foam is perfect for this purpose, as it will make the wheel silent (the claws will not scratch the metal). Make the width 1 cm larger than the height of the jar! This will help disguise sharp cuts.
- Glue the fabric, fold the edges outward and secure them with insulating tape.
A comfortable and silent wheel is ready! Attach it to the cage with wire and invite your hamster to his first training session!
If you don’t have an unnecessary hard drive, we suggest you make a hamster wheel with a bearing from a CD drive. The assembly principle is exactly the same as in the case of a hard drive.
Cardboard wheel
Even a schoolchild can make a wheel out of cardboard for his animal. But in order for the piece of furniture to turn out durable and beautiful, everything must be done carefully and accurately.
You will need:
- thin metal sleeve;
- cardboard;
- ruler;
- scissors;
- stationery knife.
First, cut out 2 identical circles of the desired diameter from thick cardboard. Make wide slits on one of them, through which you will later put the hamster in the wheel. Stepping back 0.5 cm from the edges, cut narrow rectangles along the entire circumference with a penknife. Then cut out the base and the wall to which the wheel will be attached. And finally, make a path. When cutting it out, remember that it should have protrusions on each side, equivalent to rectangular holes on the circles.
Now let's start assembling:
- We fix the track between two circles so that its protrusions fit into the rectangular holes.
- Then we attach the base to the wall.
- Make a hole in the wall and insert a metal sleeve into it.
- Place the running wheel on the hub and place jumpers on both sides to prevent it from slipping off.
The attraction is ready! The downside of a cardboard trainer is that the homa will chew it. A plus is the low cost, availability of materials and ease of manufacture.
Wooden attraction
If you have the makings of a carpenter, perseverance and a couple of hours of free time, then try making a wooden attraction for your furry pet. A running circle made of wood will last your pet much longer than a cardboard one. The principle of its creation is the same. The front wall can be made either open or closed.
Many people don’t know how to weave a wheel for their furry. This can be done using small wooden planks, willow wicker or wire. Other materials are also suitable, the main thing is to ensure that the distance between the track slats is not too large.
Tools and materials for creating a wheel
DIY dog harness: step-by-step instructions
Crafts for hamsters are made from a variety of materials using simple tools:
- wide round plastic bottle;
- scissors;
- nails;
- thick fabric;
- plywood;
- dowel with a diameter of 1 cm;
- cylinder from a computer disk (hard drive);
- metal cutting scissors or file;
- universal glue for metal;
- wire;
- bamboo wallpaper;
- swing bearing;
- drill;
- jigsaw;
- hammer;
- compass, ruler and pencil.
These tools and materials will help you create a structure with suitable parameters and securely fasten it.
Tools and materials for work
A few ideas
All hamsters love to have fun on rides. We'll tell you how to do some of them. Especially small animals like to ride down the slide, run up the stairs and explore the labyrinths. We will start with them.
Slide
Although hamsters are cowards, many of them willingly roll down the slide. Learn tips on how to make a hamster slide and make your pet's dream come true!
The best materials for making this attraction are plastic and wood. But the wooden surface must be thoroughly polished, otherwise the hamster will not slide on the slide, and it can also cause splinters on its paws. Here are ideas for creating this thing:
- Straight slide made of wood. Do you have a small smooth piece of wood? The required length is about 20 cm, and the width is 10. Just place it at an angle of 30º to the floor - and you can roll the fluffy one. This is a temporary structure designed for playing with your pet outside the cage.
- A slide of ducks. If your kids have utiki (short skis), they are ideal for playing with your pet. One ski should be taped to any support, with the rounded toe pointing down, it will ensure a smooth landing on the floor.
- Old toys. Many children have doll water parks at home. They will willingly share the slide with the hamster, because playing with the animal is more fun than with soulless toys.
- Shampoo bottle. If you have cylindrical cosmetic bottles left, cut off both ends and cut the bottle lengthwise into 2 parts. Make a ladder with a support from wood. You can also prepare a landing site. Then all that remains is to install half the bottle and roll your furry friend.
In the latter case, it is not necessary to use a bottle - this is rather an option for the Syrians. For small dwarfs, you can build a PVC slide using the outer shell of a garden hose. This is what it will look like:
Ladder
The pet will climb up the stairs to the second floor of the cage, which can also be used to create an obstacle course. It can be straight or curved. You can make the following types of ladders for your hamster with your own hands:
- From sushi sticks. The supporting slats are made from long sticks, and the short crossbars are glued to them.
- Ladder-ladder. It is very easy to do: transverse slats are glued onto a solid wooden plank to act as steps.
- Made from twigs and wire. You need to select branches with a diameter of 1 cm and alternately connect them at both ends with wire. This staircase is good because it easily turns into a bridge!
- From a broken running wheel. Cheap wheels often break, but they can be given a second life! To do this, carefully cut off the back wall with a knife. You will get a circle with slats. Now simply open the wheel by making 2 cuts on the circles. The resulting ladder can be given an interesting shape, because cheap plastic bends well.
A ladder made from a running wheel can also be used as a bridge or element of an obstacle course.
Requirements
The main criteria when choosing a cage are its comfort and safety for your pet. In addition, the future home of a furry friend should be comfortable for its owner. The owner needs to select in advance the place where the new home will be located, and also select a product for a certain size, no less than the minimum recommended for a dzhungarik.
The materials from which the cage is made must not only be durable and strong, but also safe. Rodents taste everything they see, so the grill bars they try should not be harmful to the health of the animal.
Choose a cage that is easier to clean. It is more convenient to buy a product with a pallet. Be sure to check that the door closes well.
Djungarians are very curious creatures, prone to escape, and a weak locking device may not withstand its sharp teeth. Try to buy a home with built-in attributes in advance. This will be a more economical option, and in the future you won’t have to think about where and how best to install all the additional devices.
Materials
Pet stores offer several options for hamster cages.
Made of metal rods. A good ventilated home in which the rodent feels quite comfortable. The inconvenience is that the noise the hamster makes can be clearly heard through the bars, and dirt always forms around. Filler and debris easily penetrate through the bars. The grill itself should be made of high-quality solid metal.
Do not take products made of copper or aluminum - the animal gnaws everything, so it will quickly render such rods unusable.
Plastic or glass aquarium. In such a closed home, the noise level is significantly reduced, and there is almost no garbage. In addition, this is the safest option for a home where there are cats - it is unlikely that a predator will get to the rodent, which is kept in an aquarium under a breathable mesh. However, the hamster himself will be uncomfortable in such a home, since it does not allow air to pass through well.
The inconvenience for the owner is that the aquarium is difficult to clean.
Lattice cage with plastic tray. This is the most preferred option. This cage is easy to clean. If the home is two-level, and the “floor” of the second floor is made in the form of a lattice, then check whether the pet is injured by getting its paws or abdomen stuck between the bars. If the risk of injury is high, cover the second level with cardboard.
It is recommended to buy cages in which the second floor is made of plastic and reinforced with high quality. Try to avoid wooden elements in the cage, as wood absorbs unpleasant odors and also becomes a favorite material for grinding down the rodent's incisors.
Designs and sizes
The length of the cage for one dwarf hamster should be at least 50 cm. This is even longer than for a Syrian hamster. And although the Syrian is larger in size than the Djungarian, the miniature pet still has to run a greater distance per day, so it needs a more spacious cage. If the cage is purchased without additional equipment, then do not forget that the area will be reduced due to the established mandatory attributes.
Another important point when choosing a cage is the gap between the rods. It should be no more than 10 mm.
Give preference to a cage with horizontal bars - rodents like this shape more, and it is much easier to attach additional devices to a horizontal grid for a comfortable life for a rodent.
If the distance between the rods is greater, the hamster will definitely try to escape. And even if the cage contains a fairly well-fed individual, this factor does not deprive it of its plasticity.
If you purchase a very spacious cage, then do not forget that cleaning the hamster is done quite often, and the large dimensions of the cage will significantly complicate this process.
However, if the owner keeps several hamsters at once and plans to breed them, then it is better to opt for a large cage. It is worth mentioning separately about the day of the dwelling. It can be with a retractable mechanism or high. A retractable bottom is much more convenient in terms of cleaning, but a cage with a high bottom is suitable for breeders, since the high sides will prevent curious little hamsters from falling out of the cage.
Cardboard
If you find out how much it costs to buy a trainer and decide that it’s not affordable for you, you need to make the toy yourself at home. The best wheels are made from cardboard; they are convenient for training your hamster. This design is safe and does not creak.
So let's start assembling. To build the toy, we will need to make two circles from cardboard, the size of which corresponds to the parameters of your pet. On one of the circles we cut out a passage for the hamster. Next, in a circle, we make small notches in the form of triangles along the edges. We will also cut out the wall and base to which the circle will be attached. The path should be cut in accordance with the rectangular cut-outs on the circles.
Assembling the cardboard structure:
- we insert the track so that the protrusions on it intertwine with the holes made;
- secure the base to the wall;
- insert the metal sleeve;
- We take the bushing and put one wheel on it, and then the second.
The main disadvantage of this method is that cardboard is short-lived and can be eaten by animals. Advantages: low cost and ease of preparation at home.
Hamster toys
Hamsters in nature are forced to spend a lot of time searching for food and fleeing from predators.
They don't have time for special games. In captivity, animals often become overweight due to their conditions: small cages and insufficient equipment. Therefore, in order to create ideal conditions for animals, it is necessary to properly equip the cage and fill their leisure time with special devices. Since it is unwise to put hamsters in danger by having a predator, toys should work in two directions:
- searching for food;
- physical activity.
For the first, grass balls in which a treat is buried, various types of sandboxes and structures with seeds inside are suitable.
Manufacturing
Before you start making an attraction for your pet, you should at least understand in general terms what a jogging wheel should look like.
- The attraction must be of suitable size. The animal should not be cramped inside, otherwise it will not be able to move comfortably. Excessively large dimensions of the running structure are also undesirable. It will be very difficult for a hamster to spin such a wheel with its paws. For an adult Djungarian hamster, a diameter of 14-16 cm is suitable. For animals of the Syrian breed, it is better to make the attraction larger, since they are larger. For an adult, the diameter of the circle should be at least 20 cm.
- The width of the treadmill also matters. If it is not wide enough, the hamster will periodically fall and may get injured. For small and medium-sized individuals, it is better to make a simulator 5 cm wide. For larger breeds, a track width of 7-8 cm is recommended.
- The running wheel should turn easily. Otherwise, the animal will quickly get tired and may lose interest in its attraction.
- It is worth taking care that the pet does not injure its paws during exercise. This directly depends on the material and structure of the treadmill surface. If you decide to use mesh materials, then make sure that the cells are as small as possible. Otherwise, the hamster's paw may get stuck in them while running. And also, the simulator should not have sharp jags or bumps that the hamster could trip over.
- The treadmill inside the wheel should not be slippery. Therefore, a smooth plastic surface should be covered with thick cloth in advance. The pet will be able to cling to it with its claws.
- When installing the wheel, care should be taken to ensure that it is securely fastened . The animal moves quite intensely on the track, and the shaky structure can topple while it runs. Therefore, the treadmill must be attached to the bars of the cage or placed on a strong and stable support.
To make a wheel, you can use various available materials.
What can you do for your pet yourself?
The hamster is an extremely versatile pet, since it does not require too much space to keep it, and entertainment devices can easily be constructed from what is found in every home. So what should we make ourselves?
- Cell. Build with your own hands both a temporary and permanent home for the rodent. All you need is wooden rods for the frame, plywood for the bottom and a metal mesh, preferably small, so that the baby doesn’t run away on housewarming day.
- Drinking bowl. At first, a plastic bottle and the body of a ballpoint pen can easily cope with the task of such a device.
- House. To build such a structure, almost anything your imagination desires is suitable: from a plastic box to a clay vessel.
- Homemade toys and accessories for “sports” for hamsters. There are no restrictions. Make anything you want that fits in your hamster's apartment.
Of course, the list is far from complete. Make whatever you want. The main thing: do not forget that the devices should not harm the fluffy.
Peculiarities
The Syrian hamster is one of the most common representatives among rodents, which is usually kept at home. The animal has certain characteristics that should be discussed in more detail.
First of all, veterinarians and biologists highlight such an unusual characteristic of the Syrian hamster as a changed number of toes: there are 4 on the front legs, and 5 on the hind legs
In addition, it is important to note that rodents of this species often have aesthetically pleasing fur, which is traditionally colored golden. Hamsters can also be beige, black, brown, etc.
d. Moreover, the color can be either uniform (consisting of one color) or include several tones and halftones at once.
Among other things, another unusual characteristic of the Syrian breed of rodents is the length of their coat. Thus, short-haired, long-haired and even smooth-haired individuals are distinguished. Moreover, females have much shorter fur than males.
The birthplace of this animal is considered to be Syria (where the name of the breed comes from). Later, the hamster was brought to Great Britain, and from there it spread throughout the world, including our country.
If we talk about the biological characteristics of a rodent, it is important to note that its body length usually does not exceed 12 centimeters in the wild and 20 centimeters at home. Weight varies depending on the sex of the rodent: females can weigh up to 140 grams, and the weight of males, in turn, usually does not exceed 125 grams
However, there are exceptions, the weight of which reaches 200 grams.
How to make a silent attraction yourself?
Since the hamster is a nocturnal animal, the peak of energy occurs in the dark, when the owners are already sleeping peacefully. At this moment, the fluffy is running in a wheel, creating a rumbling noise that can disturb an insensitive sleep.
Therefore, many rodent owners are wondering how to make a silent hamster wheel with their own hands. Let's figure it out together.
Let's prepare a round plastic tray or box for storing discs. You will also need a dowel with a curved screw and an awl. Then everything is elementary. We make a hole in the center of the base into which the smooth end of the screw will fit. Using an awl, we make through punctures in the running area so that the fluffy’s paws do not slip. We insert a curved screw into the dowel from the outside between the rods so that the fastener rests against the cage, and from the inside of the hamster’s apartment we put a plastic blank on the metal part.
Tips for using the machine
There is nothing fancy about this attraction, but there are several recommendations that you should pay attention to:
- The toy must be in the cage at all times.
- If the purchased wheel begins to creak unpleasantly, remove it from the mounts and lubricate them with sunflower oil.
- Young hamsters do not immediately understand why such a toy is needed. In order to accustom Homa to sports, put him on a treadmill, and place a treat a little higher. When trying to take food, the fluffy will set the wheel in motion.
- The running wheel should be washed and dried at least twice a month.
And one more thing: if you are going to install a hanging wheel, and not on a stand, adjust the simulator so that the hamster can climb on and off without hurting himself.
As you can see, creating a running wheel for a fluffy is not that difficult. Make your pet a toy so that he can have fun in your absence and at the same time keep himself in shape.
Home accessories
In order for the rodent to like the house and for the baby to grow up healthy and active in it, the housing needs to be filled with suitable accessories..
Educational toys for hamster
- Running wheel. Its dimensions depend on the size of the rodent: for the Djungarian it is a twenty-centimeter toy, for large specimens, including Syrian ones, up to 30 cm. The path on it must be continuous; it is not permissible to use a mesh for this, which can cause injury. It is important to know that hamsters like to stay awake at night, so the toy should be silent.
- Tunnels. They should be spacious and well ventilated.
- Hammocks for a hamster made from tubes of different diameters or a swing in the form of four posts, a crossbar and a perch for sitting.
- Wooden bridges or other objects for developing hamster teeth. It is good to use mineral stones and crayons. Cardboard boxes, toilet paper rolls, and branches of fruit trees are also suitable for these purposes.
- A walking ball made of safe plastic in different colors with ventilation holes and recesses for the paws.
Drinking and eating facilities
There must be a special drinking bowl in the house for drinking. You can make it yourself or use a bowl, which should be covered so that food or parts of the bedding do not fall into it. Small species of hamsters like to dig up pieces of food, so you can put them in the bedding. Large specimens require a stable food bowl that is difficult to tip over.
It is better to provide 2 containers - one for wet food and the other for dry food. Typically, rodents like to sit in the feeder, so it should be spacious enough. It is also important that there is a separate “pantry” for supplies that the hamster will definitely make. This could be a container in a secluded corner of the house. The hamster himself will “tell you” where his hiding place is, you just have to watch him carefully and then place a bowl there.
Hamster bedding
Bedding is very important for keeping the house clean and creating comfort and coziness. It can be pressed sawdust, but not too small so that it gets into the baby’s nose or gets tangled in his fur.
If wood pellets are used, they should be odorless and quickly turn into dust. Sawdust from coniferous trees can cause allergies in the animal, and fabrics and cotton wool are dangerous because they can tear into fibers in which the hamster can become entangled.
The best bedding materials for a hamster in a house are pieces of corn cobs with kernels, which can also be buried. Paper napkins or white unscented toilet paper are suitable for this.
The floor layer should be at least 6 cm deep, because hamsters love to play and burrow into it. When it gets colder, its thickness increases. It needs to be cleaned daily and changed once a week. A little granules from the previous bedding should be added to the fresh litter so that the familiar smell remains, otherwise the animal will become nervous.
Toilet
Hamsters are known for their cleanliness, so they need a separate place in the house for the toilet. You will have to clean it daily, removing waste and adding clean bedding. A cardboard tray is well suited for this purpose; this material is replaced quite often, because... it absorbs urine well, partially absorbing its odor.
The litter filler is often special clean sand, which the animal likes to rummage in, scattering it around. But sand does not hold odors well, so it needs to be changed often. Cat litter or mineral granules are not suitable for this - they can cause poisoning or allergies in your furry friend.
Sand bath
This is an important element of equipping a house for a hamster that does not like water treatments. They are successfully replaced by bathing in special sand for chinchillas. To clean the fur from grease and dirt, place a high container with a ladder in the house. An option with a hole cut in the side is acceptable.
It is closed on top with a lid that prevents the contents of the container from spilling out. The volume of the bath should be twice the size of the furry pet, and its sides should be high enough.
From plastic bottles
It’s worth saying right away that building a maze for a hamster from plastic bottles is more difficult than from a construction set - here a child cannot do without the help of an adult.
To work, you will need a sharp utility knife and plastic bottles. Their number can be either half a dozen or fifty. The more bottles, the longer and more interesting the labyrinth you can build.
If a hamster can be released into the labyrinths described above only under the supervision of the owner, then he can spend whole days in the bottle labyrinth. Perhaps he will be no less comfortable here than in his usual cage. And there will be much more space for physical exercise. True, a large labyrinth will take up quite a lot of space - also take this into account when starting work.
Having a sufficient amount of material, you can begin construction:
- Take two bottles. In one of them, on opposite walls, make two holes - a large one and a small one. One should correspond to the diameter of the bottle neck, and the second should correspond to the diameter of the bottle.
- Also make a hole near the neck of the second bottle so that the hamster can easily crawl through. Carefully process the edges - there should be no burrs or sharp surfaces here so that the rodent does not get injured during play.
- From the second bottle, unscrew the cap and insert the neck through the large hole, and then through the small one.
- Replace the cap of the second bottle.
Now you have a short maze consisting of two bottles. A hamster placed in one of them will be able to freely make its way into the second; all that remains is to lengthen the labyrinth to the size that seems optimal to you.
When making a labyrinth from plastic bottles, do not forget to make at least several holes in each bottle - it is best to use a thick awl or a hot nail here. Thanks to these holes, the air will be renewed, and your hamster will definitely not suffocate during his morning run.
You can create several spacious areas in the maze using five-liter water bottles. Place a small wheel in one, equip a drinking bowl and feeder in another, a house in the third, and so on. As a result, you will get not just a homemade maze for your hamster, but a full-fledged house with a treadmill.