If you have already purchased a glass aquarium, selected fish of certain species and plants, added decorative elements, but something is still missing to complete the picture. To add expressiveness and completeness to a small aquatic world, use an aquarium background. It is better to think in advance about the arrangement of the “water world” and select an aquarium background even before launching and populating the living creatures.
Why do you need a background?
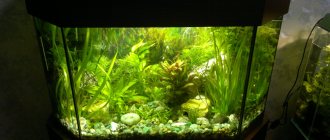
The background for the aquarium will hide the unsightly wall, all kinds of wires and pieces of equipment from view. The background will create the impression of deeper space in the body of water. It will remove the reflections of light, give it a natural look, the fish will feel more comfortable, almost like in their natural environment. This is especially true for home ponds that are not located near the wall.
The background for the aquarium is a beautiful decorative element, which is also inexpensive and available in almost every pet store. This simple element can transform a piece of the aquatic world, especially if it is chosen correctly and looks harmonious with the rest of the aquarium environment. The background serves a decorative function.
Required materials and tools
Installing a background for an aquarium with your own hands takes literally 10-20 minutes, depending on the size of the container. To carry out the work you need to prepare such materials.
- Decorative sticker or panel . It is better to choose a self-adhesive film option.
- Scissors, ruler and pencil. All this will help you cut the workpiece to the desired size.
- Glycerin or liquid soap for preparing the solution. The first option is needed when fixing a film without an adhesive layer. Soapy water will help the self-adhesive stick nicely.
- Plastic card . Used instead of a spatula to smooth out the material.
- A soft, lint-free cloth . To wipe the glass, you need to use a piece of cloth that will not leave dust or debris.
To work with glycerin you need a brush. Moreover, it must first be thoroughly cleaned of possible debris. If you use a soap solution, you need a spray bottle. It is better to place a cloth or film under the aquarium.
It is important to arrange the place for such work as comfortable as possible.
What types of background are there?
The most common types of back wall decoration are film and relief.
Film
The most convenient option for beginner aquarists, it has a number of advantages:
- The cheapest decor option.
- Wide variety of pictures. If you don’t find a suitable image in the store, you can print the one you like from the Internet.
- Easy installation and quick replacement.
- Suitable for small aquariums.
The main subtlety in using such a backdrop is to carefully stick the film onto the aquarium so that everything is smooth, without wrinkles, bubbles and protruding corners. A film backdrop is not suitable for large aquariums, where it will look unsightly. Moreover, gluing film to a large aquarium is much more difficult.
Raised
Embossed backgrounds are visually more attractive and are usually attached to the back wall of the aquarium. A volumetric background for an aquarium looks more impressive. However, it has a number of disadvantages, or better yet, features:
- Not suitable for non-standard aquarium sizes.
- It is necessary to regularly clean the algae that grows on it.
- Quite a high cost.
- Difficult to replace.
- Slightly reduces the amount of usable space.
The relief background is attached to the back wall of the aquarium from the inside using special silicone glue, which is included in the kit. This backdrop can also be secured by pressing it with soil. The first method is preferable because it is more reliable.
Step by step instructions
To properly glue the aquarium background, you need to follow the step-by-step guide. This will allow you to decorate the structure in an even layer without bubbles or folds.
Film preparation
Before cutting the film, you should evaluate the size of the glass and cut the required piece. It is important to be especially careful at this stage, as an uneven cut will impair subsequent gluing. Cutting should be done using a utility knife and ruler. If you have no experience in performing such actions, you should practice on a small piece of film.
How to prepare glass for gluing film
The surface of the aquarium needs to be thoroughly cleaned before applying the film. If there are tiny contaminants on the glass, you will not be able to remove them after applying the layer.
It is better to clean glass with a special liquid and wipe it with microfiber.
Humidification of aquarium glass
To apply the material, you must first moisten the surface of the aquarium glass using a simple solution consisting of water and detergent (for example Fairy).
Such impregnation will facilitate the correct selection of a suitable position for the film and will quickly displace any air bubbles present.
Smoothing the film
The next step is to smooth the film to remove wrinkles and air bubbles. For these tasks, use a plastic card or ruler. It is better to move the bubbles from the central part of the film to the edges.
When applying the film, it is important to follow all stages sequentially and work carefully.
Trimming excess
At the finishing stage, you should check for traces of air or other defects on the decorative coating. The remainder of the film must be trimmed with a stationery knife.
How to paste a background into an aquarium
Before sticking the background onto the aquarium, you need to thoroughly clean the glass. If specks and dust remain on the surface of the glass, they will interfere with fixation and will be visible when the backlight is on. There are several ways to glue film to an aquarium:
- Use water. The easiest way is to wet the surface of the glass with water and carefully smooth the film with a cloth or ruler.
- Glue it on tape. You can use both single-sided and double-sided tape.
- Glue on glycerin or mineral oil. This and the previous method will not work if you decide to glue the background pattern to the inside of the glass vessel.
- Use clear sealant or silicone adhesive.
Regardless of the method you choose, you will need to be careful so that the picture is not distorted and the background looks natural. To make installing the backdrop even easier, you can use aquarium stickers.
If you decide to glue the selected background to the inside of the aquarium, make sure that the glue is safe for fish.
Secrets of getting the job done
First of all, pay attention to the dust. Because of this, bubbles can form on the film, which can be noticeable and spoil the entire appearance of the aquarium. A big disadvantage will be the shadow from this dust when the backlight is turned on. Therefore, it is necessary to take care of the cleanliness of the back wall. Before gluing the film, you need to thoroughly spray water around the work area so that dust does not fly around you.
A soap solution and a spray bottle will be an assistant in cleaning glass. Spray the soap solution onto the glass and wash the surface thoroughly. Some aquarists manage to glue the film onto a soap solution, but it is almost impossible to achieve a thorough fit and no streaks.
Thus, sticking the film on the aquarium will not be difficult. It is easy to manipulate, so you can glue one today and another tomorrow, changing the interior of the aquarium at your discretion.
How to make a background with your own hands
There are several more extravagant ways to decorate your home pond. You can make the background for the aquarium yourself. For example, you can create a background for your aquarium yourself using painting. It will look picturesque if you paint the back wall of a glass vessel with stained glass paints and create an original interior landscape. The uniqueness of the background is guaranteed. This method is suitable for creative people with artistic taste.
Those who like to grow indoor plants can create a background of bindweed, tradescantia or other vigorously growing flowers and vines. Volumetric back walls made of polystyrene foam or polyurethane foam and imitating stone ledges look very impressive. The result is three-dimensional structures that are in no way inferior to the polyurethane assortment from the store.
Here you need to pay attention to dyes; choose those that are non-toxic and do not affect aquatic life. To create a suitable interior and a more comfortable environment for fish, use driftwood that will act as a shelter. In addition, they give an interesting, and most importantly, natural look to the created aquatic biotope.
Direct gluing
Direct gluing can be used if design changes are not expected. Getting rid of the pasted film is problematic and will require a lot of time, so you must first evaluate whether it is worth making a permanent design.
It is also allowed to paste the background from inside the aquarium. The film is made from materials that are safe for its inhabitants and does not affect the quality of water. The only limitation for gluing the background internally is the use of methylene blue in the aquarium, which will color it.
The background film is glued to a surface that has been previously cleaned and wiped dry. Gluing is done in the same way as when using a base board. The only difference is that the excess decor is cut off and not wrapped around the base. It is convenient to trim off the remaining background with a cutter. Additionally, after smoothing the film with a soft cloth, the aquarium is left without water for 2 days so that the glue adheres tightly to the glass. When filling a reservoir, you should not pour water over the wall with the background.
If the film needs to be removed, it will be very difficult to do so, as it leaves traces of glue on the glass. It is impossible to wipe them off with a sponge. To remove glue residue, use tape, which is glued to the stain and peeled off after 2 minutes. The tape will take any remaining glue with it. The procedure is troublesome and lengthy. This is taken into account when gluing the background to the glass.
What to do if the film lays unevenly, how to get rid of folds and bubbles?
In the absence of skills in working with film, wrinkles and bubbles appear. If you couldn’t do without them, don’t be upset: you have 3–6 hours to correct the situation. What can be done:
- Poke small bubbles with a needle and press the film at the puncture site to the glass.
- Peel off the film completely and repeat the operation. It is necessary to peel off gradually, in small sections, while simultaneously stretching and leveling the film sheet. For better results, you can heat the film with a hairdryer or fan.
- For novice designers, it is better to take a thick film for their first experiments and use a soap solution to stick it on.
Recommendations
To create a beautiful aquarium, you can paste an attractive background on the back wall. Simple tips that will help you complete the task as efficiently as possible.
- If you want to stick a film without bubbles, then you need to be as careful as possible with dust. Even a small amount of it on the glass can nullify all efforts. Moisten everything near the work area with a spray bottle so that debris does not fly onto the film.
- If after gluing air bubbles appear, then you should drive them away with a needle and a plastic card. Moreover, it is better to take not a sewing needle, but a thin one from a syringe.
- It is better to try the background on the aquarium before removing the protective sheet from the adhesive backing. If the aquarium is large, then it is worth fixing the background with tape and then gluing it in parts.
- It is important that the film fits as tightly as possible to the glass. Otherwise, darkened spots will be visible. This looks especially bad when artificial lighting is turned on in the aquarium.
To learn how to glue a background to an aquarium, watch the video below.